About BlindSquare

Accessibility, Apple, Apple Store, Apps, Blind, blind people, iPad, iPad Air, IPAD AIR 2, iPad mini, iPad mini 4, iPhon, iPhone, iPhone 6, iPod touch

BlindSquare is a solution that makes use of the latest features available in smartphones to aid the blind and visually impaired in their daily lives. It has been developed and tested in close cooperation with blind and visually impaired users. BlindSquare is available for iPhone and iPad in the App Store.Using your iOS-device’s GPS capabilities, BlindSquare determines your location and looks up information about your surrounding on Foursquare and Open Street Map. It then ascertains the information most useful to you and speaks it in a clear, synthetic voice. It can inform you about shops, restaurants, public buildings, and parks in your vicinity. It will also tell you when you approach a street intersection. You can use it to determine the address of your current location, find places of interest near you, get alerted when you reach places, and save your own places in BlindSquare. You can also use BlindSquare in conjunction with other navigation apps such as Navigon, TomTom, the free Google Maps, and the iOS maps app installed on each iOS-device. These third-party apps can provide spoken turn-by-turn directions, while BlindSquare can inform you about your surrounding and upcoming street intersections.

BlindSquare can go a long way towards helping you to travel more independently, but it will never substitute good orientation and traveling skills. GPS-readings can be unreliable depending on the quality of your GPS-reception. Be sure to use your best judgment when deciding if BlindSquare’s information is correct in a given situation.

BlindSquare is $39.99 in the App Store.  

http://www.blindsquare.com

Battery life with iOS 10

Accessibility, Apple, Blind, iOS, iPad, iPad Air, iPhon, iPhone, ipod, iPod touch, Live video event, Low vision, Low vision aids, OS X

If you’ve upgraded your iPhone, iPad or iPod touch to iOS 10, and are facing battery life problems then check out the tips after the break to see if they help in fixing the problem.

iOS 10 comes with a number of new features such as major updates to the Messages app, new Home app, all-new Photos, Music and News apps, Siri integration with some types of third-party apps, VoIP calls integration in the Phone app, and lots more. So it is possible that features such as
The problem with battery life issues is that it is very subjective as it is based on your usage pattern, so it is difficult to pinpoint what exactly is causing a problem.
Note: I’ve noticed that people are quite cynical about such articles as most of them tell you to disable features. The aim of the article is not to tell you to disable features on your iPhone, but the purpose is to provide you information about the various settings that are available, so you can disable the features that you don’t use as it would help in extending your iPhone’s battery life.

How do I clean my AirPods?

airpads, Apple, Apple ID, blind people, iOS 10, IOS 8, iOS 9, iPad, IPAD AIR 2, iPad case, iPad mini, iPhon, iPhone 4s, iPhone 6, iPhone battery

Protect your investment with regular cleanings and good aural hygiene. Dropping $160 on a pair of wireless earbuds in a dental-floss-sized case is no small decision. If you decided to spring for a pair of AirPods, you’re going to want to take good care of them so they’ll last you a couple rounds of iPhone upgrades. After all, these ones don’t come bundled in the box. Here’s how you clean your AirPods and keep ’em clean! With dirt, dust, lint, grime, ear wax, and more constantly finding its way onto your glossy white AirPods, you’re definitely gonna want to clean them from time to time. Consistency is your friend, friend: The best way to ward off long-lasting grime is by preventing it from building up. Clean and clean regularly.

Carry a microfiber cloth

Get a little microfiber cloth and keep it on your person or store it wherever you charge your AirPods. Give your AirPods (and the case if you want) a quick buff every couple days.
If you happen to spot an offending smudge, go ahead and wipe it away.
You can pick up a six pack of microfiber cleaning cloths from Amazon and be set for life … or at least the life of your AirPods! Do not use hand sanitizer on your AirPods. You risk damaging the polish — or worse, the electronics. Instead, a little bit of water (purified is better than tap) on a cloth can help you wipe away the grease and grime.

As much as I wish Apple’s AirPods were a seamless piece of plastic, they’re not. And the tiny, tiny little cracks and crevices start to fill up with dust, grime, etc. When a cloth-polish just won’t do, you’ve gotta get up close and personal.
I find a cotton swab is great for a thorough cleaning of your AirPods. Whether you’ve got ear wax clinging to the speaker grilles or dirt in the seams, a cotton swab will usually do the trick.
Lastly, if you’ve got a particularly stubborn smudge that won’t wipe away from the surface of your AirPods, you might try giving it a quick swipe or four with a rubber eraser. The rubber will pull the mark from the surface of your AirPods.

A word of warning, though: Don’t get lazy! Check on your little Pod Pals from time to time to make sure they’re not collecting grime.


Microsoft Seeing AI app Helps Blind People ‘See’ The World With AI

Apple, Apps, Blind, Chelsea Stark, iOS, iPhon, iPhone, iPhone 4s, Low vision aids, Visually Impaired

Image result for Microsoft Seeing AI app
Microsoft Seeing AI app  Helps Blind People ‘See’ The World With AI 

 A new app for iPhone users describes objects and reads text in the world using the phone’s cameraGet More Ideas https://youtu.be/R2mC-NUAmMk

Image result for Microsoft Seeing AI app


Keep your notes secure with password-protection

Apple, Apple ID, CarriersUpgrading to the iPhone, iOS, iOS 10, iPad Air, iPhon, iPhone, iPhone 6, ipod, iPod touch, notes

You can secure the notes that contain your most personal data—such as financial details, medical info, or website logins—with a password or fingerprint.

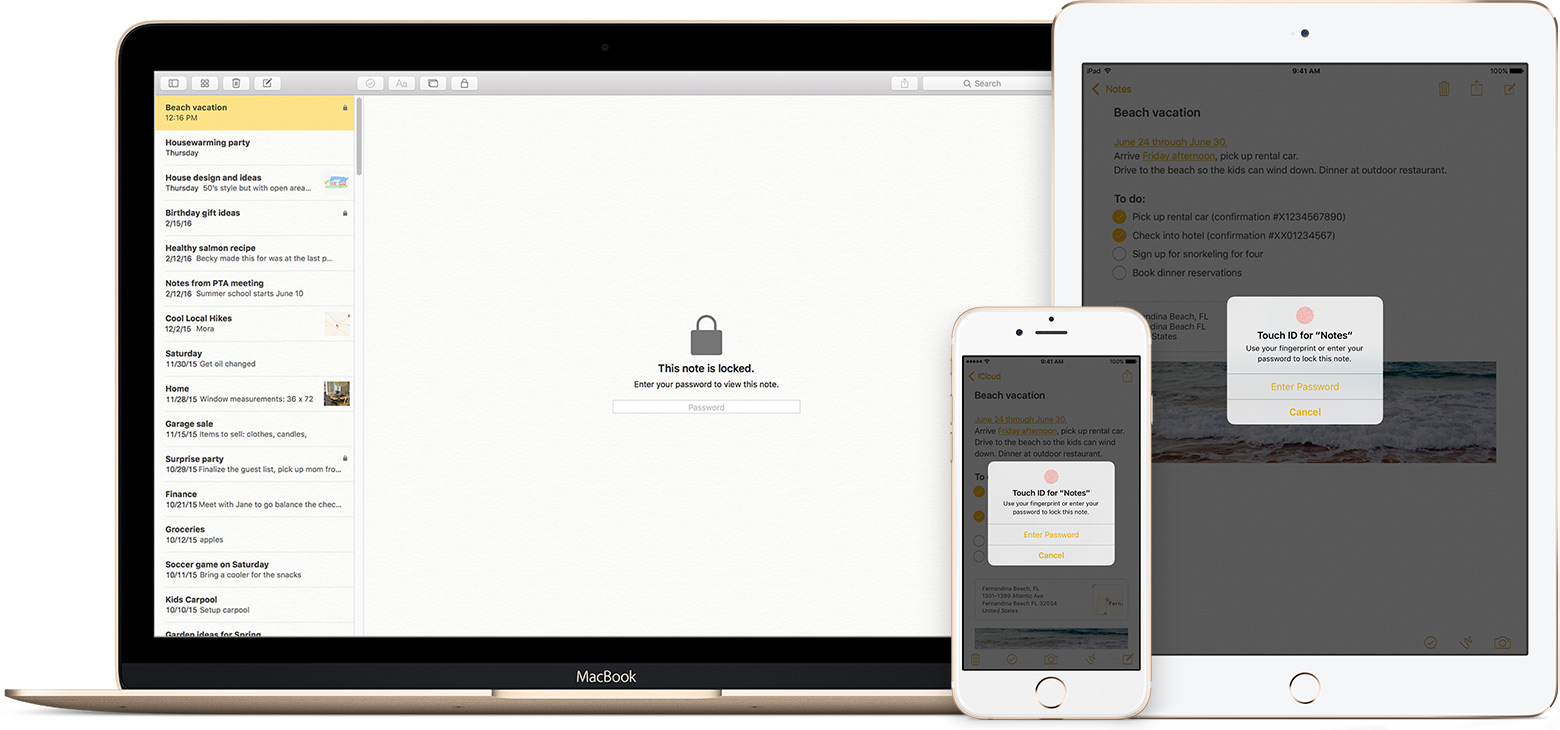
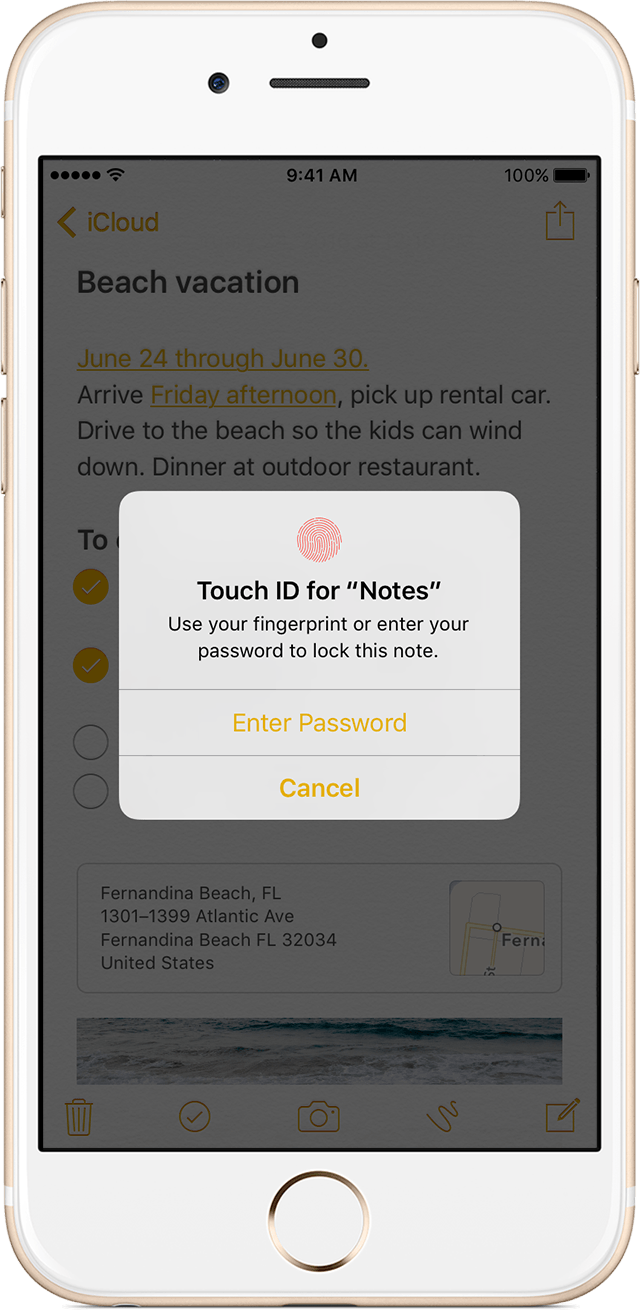
The Notes app lets you lock any note that you want to keep private from anyone else that might use your device. Notes uses a single password for all of the notes that you want to protect, on all of your devices. And if you have an iPhone or iPad with Touch ID, you can use your fingerprint to open your locked notes.

Before you begin

Set up your notes password

Before you can lock your notes, create a password that you can easily remember. If you’re concerned about forgetting your password, make sure that you give yourself a password hint and that you set up Touch ID. If you forget your password, Apple can’t help you reset it.
If you access your iCloud notes on more than one Apple device, you’ll use the same notes password to lock and unlock all of them.

On your iPhone, iPad, or iPod touch

You can create a password in your device Settings or directly in the Notes app. Then you can turn on Use Touch ID on your iPhone or iPad, so that you can use your fingerprint to unlock your protected notes.

Create a password in Settings

  1. Go to Settings > Notes.
  2. Tap Password.
  3. Enter a password, then give yourself a password hint.
  4. Tap Done.

Create a password in Notes

  1. Open a note that you want to lock.
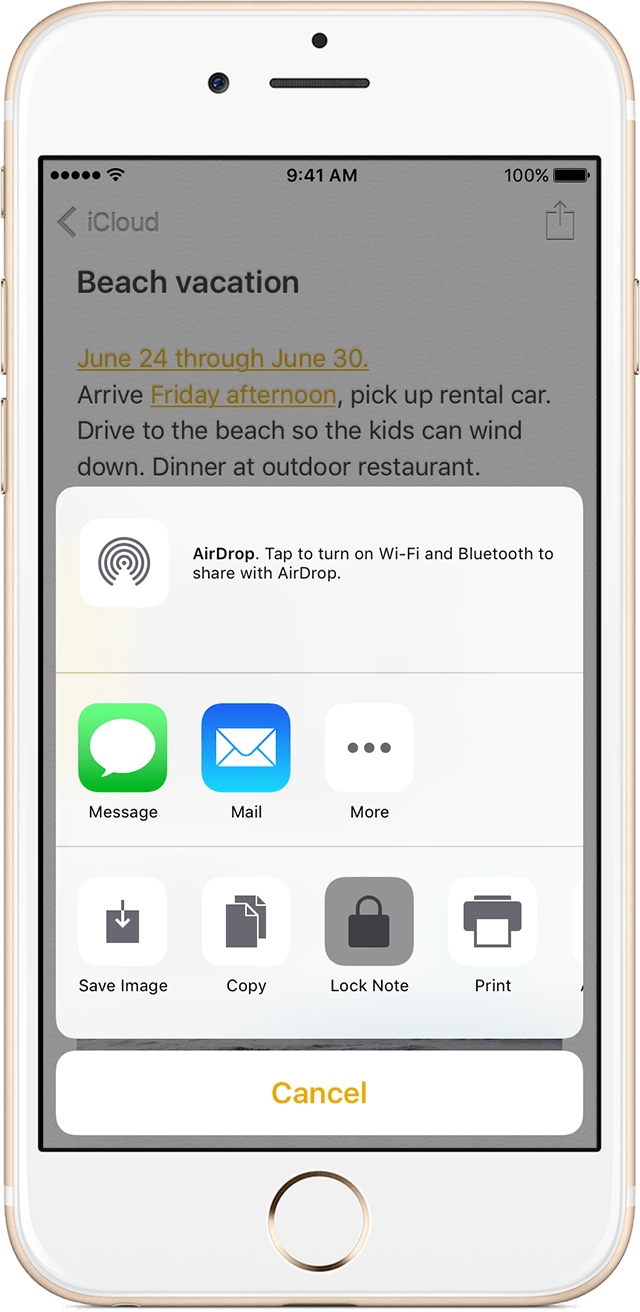
  2. Tap Share icon > Lock Note.
  3. Enter a password, then give yourself a password hint.
  4. Tap Done.

On your Mac

You can create a password on your Mac directly in the Notes app. In the menu bar, click Notes > Set Password. Enter a password, then give yourself a password hint and click Done.

Use Notes password-protection

Whether your note has an image, sketch, map, URL, or list of important information, it’s simple to keep it safe with password-protection. And when you need to access your secure notes, you can tell which ones are locked directly from the Notes list. Just look for the  next to the note. Until you enter your password or use Touch ID, you only see the title and the last date that it was edited.
You can’t password-protect notes that you share with someone else. If you want to stop sharing a note, open , then tap or click Stop Sharing.
     

Lock a note

On your iPhone, iPad, or iPod touch:
  1. Open the note that you want to lock.
  2. Tap Share icon .
  3. Choose Lock Note.
After you lock your note, it stays open and you’ll see unlocked notes icon at the top of the screen. You can hide the note’s contents when you tap .
On your Mac:
  1. Open the note that you want to lock.
  2. Click lock notes icon.
  3. Choose Lock Note.
You can only lock notes on your device and notes in iCloud. You can’t lock notes that have PDFs, audio, video, Keynote, Pages, Numbers documents, or notes that use IMAP to sync (like Yahoo!, Gmail, and Hotmail).
     

Open a locked note

On your iPhone, iPad, or iPod touch:
  1. Tap the locked note.
  2. Tap View Note.
  3. Enter your password or use Touch ID.
On your Mac and iCloud.com:
  1. Click the locked note.
  2. Enter your password.
Your locked notes stay open for up to three minutes, making it easy for you to jump to another note, copy and paste information from other apps, and more. If you close the Notes app or your device goes to sleep, the note locks again.
     

Remove a lock

On your iPhone, iPad, or iPod touch:
  1. Tap the locked note.
  2. Enter your password or use Touch ID.
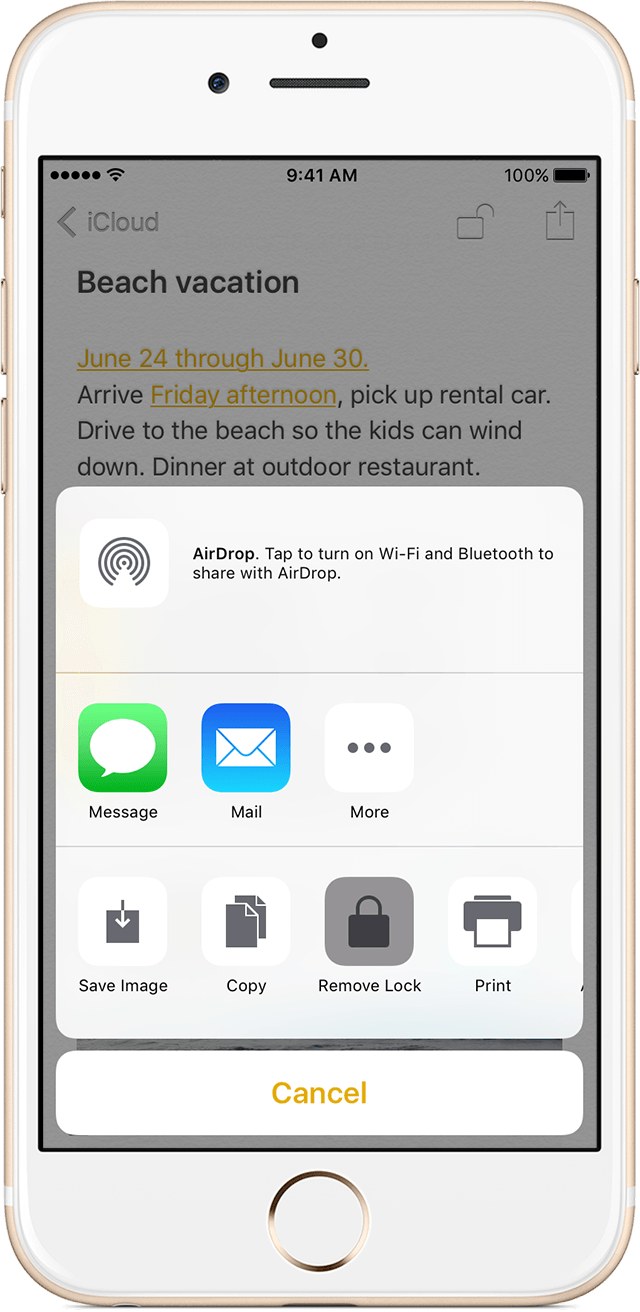
  3. Tap Share icon.   
  4. Choose Remove Lock.
On your Mac:
  1. Click the locked note.
  2. Enter your password.
  3. Click .   
  4. Choose Remove Lock.
When you remove a lock from a note, it’s removed on all of the devices that you’re signed in to with the same Apple ID.

Change your password

On your iPhone, iPad, or iPod touch:
  1. Go to Settings > Notes > Password.
  2. Tap Change Password.
  3. Enter your old password, then enter a new password and password hint.
On your Mac:
  1. Open Notes.
  2. In the menu bar, choose Notes > Change Password.
  3. Enter your old password, then enter a new password and password hint.
  4. Click Change Password.

If you forgot your notes password

You can unlock a note only when you enter the password that it’s locked with. If you forgot your password, Apple can’t help you regain access to your locked notes.
You can reset your password, but this won’t give you access to your old notes. It will, however, let you password protect any notes that you create from that point forward with the new password. This could lead to you having multiple notes with different passwords.
If you have multiple passwords, you can’t tell which password you should use when you look at your notes in the Notes list. When you open a note locked by your old password but enter your current password, you’ll see an alert that you entered the wrong password with a hint for your old one. If you then enter the correct old password, you get the option to update that note’s password to your current one.

Reset your notes password

When you reset your Notes password, it doesn’t delete or change the password of your notes that are already locked. If you have a note that uses an old password, you can update it to the new password when you enter the old password, remove the old password, then apply your new password to the note.
On your iPhone, iPad, or iPod touch:
  1. Go to Settings > Notes > Password.
  2. Tap Reset Notes Password.
  3. Enter your Apple ID password.
  4. Tap Reset Notes Password again.
  5. Enter your new password and password hint.
On your Mac:
  1. Open Notes.
  2. In the menu bar, click Notes > Reset Password > OK.
  3. Enter your Apple ID password.
  4. Click Reset Password.
  5. Enter your new password and password hint.

How to improve iOS 10 Battery Life

Accessibility, battery usage, iCloud, iOS, iPhon, iPhone

f you’ve upgraded your iPhone, iPad or iPod touch to iOS 10, and are facing battery life problems then check out the tips after the break to see if they help in fixing the problem.

iOS 10 comes with a number of new features such as major updates to the Messages app, new Home app, all-new Photos, Music and News apps Siri integration with some types of third-party apps, VoIP calls integration in the Phone app, and lots more. So it is possible that features such as  The problem with battery Life issues is that it is very subjective as it is based on your usage pattern, so it is difficult to pinpoint what exactly is causing a problem.  Note: I’ve noticed that people are quite cynical about such articles as most of them tell you to disable features. The aim of the article is not to tell you to disable features on your iPhone, but the purpose is to provide you information about the various settings that are available, so you can disable the features that you don’t use as it would help in extending your iPhone’s battery life.

Tips to Fix iOS 10 Battery Life Problems


1. Battery usage

The first step in fixing the battery problems is to understand battery usage. iOS gives you a breakdown of battery usage by apps. It even gives you the amount of time the app was used and the amount of time it was running in the background. You can use that information to identify the battery hogs.


    How to find battery usage

    • Launch the Settings app
    • Tap on Battery

    • 2. Push Email

      Push email can be a primary cause of battery drain on some devices. To identify if your email is Push or Fetch, launch the Settings app, and navigate to Mails, Contacts and Calendars > Fetch New Data. You need to check if the email account has been set as Push, Fetch or Manual.

      Push ensures that you get an instant notification when you get a new email, whereas Fetch will look for new data 15 minutes, every 30 minutes, hourly or when you launch the Mail app (manually). You may want to disable Push email temporarily for your email accounts to see if it improves battery life.
      Alternatively, if you use multiple email accounts then you may want to disable Push for email accounts where you don’t need to get an instant notification for new email, and switch to Fetch. The higher the fetch interval, the better it is for battery life, so you can set it appropriately based on the importance of the email account.

      3. Background App Refresh

      iOS’ smart multitasking feature lets apps fetch content in the background. Although Apple has made a lot of optimizations to ensure that battery consumption is minimal, it’s possible that poorly developed app can drain battery life due to this feature. To disable Background App Refresh go to Settings > General > Background App Refresh > and turn it off for apps that don’t absolutely need to be updated all the time. Background App Refresh is a great feature, but you don’t need it for every app. I would strongly recommend turning it off for the Facebook app as it is known to drain battery life.


      4. General Tips

      Please note that the tips under section are to highlight areas where you could disable things that are not applicable to you so you can maximize battery life. We are not recommending or advising you to disable features just for battery life, as then there would be no point in using smartphones like the iPhone.

      Remove Unwanted Widgets

      Swipe right from the edge of the Home screen or Lock screen to open Today View. You can add widgets to the Today View to get timely information from your favorite apps, however, they can drain battery life since they fetch data in the background to show up-to-date information. You should review the list and remove the widgets that you don’t want to ensure they don’t consume battery life unnecessarily as some of them could be using Location services.
      Swipe down from the top edge of the screen to access Notification Center. Then swipe to the left to access the Widget tab, scroll down and tap on Edit button. Tap on the red button to remove the widget from the Notification Center.

      Turn off Dynamic Wallpapers

      Dynamic wallpapers bring subtle animations to the Home and the Lock screen. Unfortunately, the animations take up CPU cycles and consume more battery. So if you have set a dynamic wallpaper, and you’re having battery issues, go to Settings > Wallpaper > Choose Wallpaper where you can go to either Stills or your set an image from your photo library as your wallpaper.

      Disable Motion Effects, Parallax

      Apple added a number of animations and physics-based effects to the interface in iOS 7 to help users understand the layered elements in the UI. Some of these effects even access gyroscopic data, which contributes further to battery drain. You can disable these motion effects by going to Settings > General > Accessibility > Reduce Motion and turn on the switch.

      Disable App Store’s Automatic Updates

      App Store automatic installs app updates in the background, but if you’re not too keen on updating all your apps, you can turn this off by going to Settings > iTunes and App Store > scroll down to the Automatic Downloads section and turn off the “Updates” switch. While you’re there, you can also tell iOS to not use cellular data for automatic downloads and iTunes Match streaming.

      Disable unwanted indexing in Spotlight search

      Spotlight searches a lot of types of content like Applications, Contacts, Music, Podcasts, Mails, Events etc., when you might use it only for contacts, applications, and music. So uncheck the type of content you don’t want to search by going to Settings > General > Spotlight Search.

      Turn off Push Notifications

      If you receive a lot of push notifications, your battery can take a hit, so make sure you turn off push for apps that you don’t frequently by navigating to Settings > Notifications > Scroll down to the Include section to see the list of apps and tap on any of them to turn notifications off.

      Other tips

      • If you don’t connect Bluetooth devices to your iPhone then turn it off (Settings -> General -> Bluetooth)
      • Set Auto-Lock interval so that your iPhone will turn off more quickly after a period of inactivity. To set the auto-Lock interval, launch the Settings app, tap on General and then Auto-Lock and set the auto-lock interval to either 30 seconds, 1, 2, 3, 4 or 5 minutes.
      • You’re probably aware that using Wi-Fi drains iPhone’s battery, but perhaps you didn’t know that one of the most intensive processes that iPhone’s Wi-Fi chip has to do is search for available network. So if this happens in regular intervals, it’s going to have a noticeable impact on your battery. To disable this feature, launch the Settings app, tap on Wi-Fi, and tap on the On/Off toggle for Ask to Join Networks to disable it. Please note that by disabling this feature, your iPhone will join known Wi-Fi networks automatically, but you will have to manually select a network if no known networks are available. Note: It is disabled by default.
      • Dimming the screen helps to extend battery life. You can either lower the default screen brightness based on your preference or turn on Auto-Brightness to allow the screen to adjust its brightness based on current lighting conditions. Launch the Settings app, scroll down and tap on Brightness & Wallpaper and set Auto-Brightness to On. Note: Apple enables it by default.
      • Turn off Location services for the following System System services: Diagnostics & Usage, Setting Time Zone, Location Based iAds (Settings -> Privacy -> Location Services -> System Services).

    • 5. Location Services

      When we install apps, they prompt us to give them access to various things such location etc., and we tend to blindly say yes. However, apps using location services can have a major impact on battery life. So you may want to review which apps should have access to your device’s location. The best way to approach this is to first disable location services for all the app. You can disable location services via the Settings app and navigate to Privacy > Location Services. After you’ve disabled location services for all apps, you identify which apps such as navigation apps should use location services and enabled them individually.

      Use Location Only While Using the app

      In iOS, you can allow apps to use Location Services only while using the app, so the apps don’t use it all the time. This can be useful for apps like the App Store, which don’t need to be using location services all the time.
      You can see which applications have recently used location services by going to Settings > Privacy > Location Services. Apps that recently used your location have a purple compass-like indicator next them. Tap on the app, you should see the While Using the App, tap on it if you want the app to use location services only while using the app. This will ensure that the app will access your location only when it or one of its features are visible on the screen. As you can see below, iOS also tells you the App Store app is using location services to “find relevant apps nearby”.   Developers need to add support for this feature, so you may not find this option for all apps. If you’ve accidentally disabled location services for an app that needs to use it, don’t worry, it will prompt you to give access to Location Services when you launch it. I would strongly recommend change the setting to While Using the App for the Facebook app to prevent it from draining battery life.

      6. Place your iPhone Facedown

      iOS includes a new facedown detection feature, which makes use of the ambient light sensor to ensure the display doesn’t light up when you receive a Notification when you place the iPhone facedown. The feature along with other refinements helps in improving battery life by an additional hour as it turns off the display when not in use. So when you place your iPhone on the table, you should place it facedown to conserve battery life. Please note the Facedown Detection feature is available only on iPhone 5s or later devices.

      7. Check Cell Signal

      If you live or work in an area that has poor or no LTE coverage or your carrier doesn’t offer LTE yet, then you should consider switching to 3G to prevent the LTE radio from draining battery life unnecessarily. To switch to 3G, navigate to Settings -> General -> Cellular/Mobile -> Enable LTE/Enable 4G and tap on the Off option.

      8. Use Low Power Mode

      If your device is running low on battery, and you still have some time to get to a power source, then you could enable the all-new Low Power mode by going to Settings > Battery and tapping on the toggle. Low Power Mode temporarily reduces power consumption by turning off or reducing mail fetch, background app refresh, automatic downloads, and some visual effects. Apple states that Low Power Mode mode can extend battery life by an additional 3 hours.  You will also get a prompt to enable Low Power Mode when you hit 20% battery remaining, and will automatically disable it when battery remaining crosses 80%.

      9 Troubleshooting

      Restart/Reset Your iPhone

      Hold down the Sleep/Wake button and the Home button at the same time for at least ten seconds, until the Apple logo appears.

      Resetting Network Settings 

      Reset network settings by tapping Settings -> General -> Reset -> Reset Network Settings. This will reset all network settings, including passwords, VPN, and APN settings.

      Battery Maintenance

      Apple advices users to go through at least one charge cycle per month (charging the battery to 100% and then completely running it down). So if you haven’t done it already, it may be a good time to do it. Power cycling your device helps in recalibrating the battery indicator more accurately.

      10. Restore iPhone as New

      This is not ideal but the last resort. If you’ve setup your iPhone by restoring from backup then the battery life problems could be due to some issue with the backup. Try to restore your iPhone (Settings -> General -> Reset -> Erase All Content And Settings) and set it up as a new iPhone (not from the backup). But before you erase all the contents and settings, take a backup of your iPhone using iTunes or iCloud, or selectively take a backup of your photos and videos using Dropbox or Google+.
      We’ve seen quite a few comments from readers who have found that the battery life is better after setting up the device as a new iPhone/iPad/iPod touch.
      Did you face battery life problems after upgrading to iOS 10? Did any of these tips help? Let us know in the comments.

      Like this post? Share it!

      How to improve iOS 10 Battery Life

      Accessibility, battery usage, iCloud, iOS, iPhon, iPhone

      f you’ve upgraded your iPhone, iPad or iPod touch to iOS 10, and are facing battery life problems then check out the tips after the break to see if they help in fixing the problem.

      iOS 10 comes with a number of new features such as major updates to the Messages app, new Home app, all-new Photos, Music and News apps Siri integration with some types of third-party apps, VoIP calls integration in the Phone app, and lots more. So it is possible that features such as  The problem with battery Life issues is that it is very subjective as it is based on your usage pattern, so it is difficult to pinpoint what exactly is causing a problem.  Note: I’ve noticed that people are quite cynical about such articles as most of them tell you to disable features. The aim of the article is not to tell you to disable features on your iPhone, but the purpose is to provide you information about the various settings that are available, so you can disable the features that you don’t use as it would help in extending your iPhone’s battery life.

      Tips to Fix iOS 10 Battery Life Problems


      1. Battery usage


      The first step in fixing the battery problems is to understand battery usage. iOS gives you a breakdown of battery usage by apps. It even gives you the amount of time the app was used and the amount of time it was running in the background. You can use that information to identify the battery hogs.

        How to find battery usage

        • Launch the Settings app
        • Tap on Battery

        • 2. Push Email

          Push email can be a primary cause of battery drain on some devices. To identify if your email is Push or Fetch, launch the Settings app, and navigate to Mails, Contacts and Calendars > Fetch New Data. You need to check if the email account has been set as Push, Fetch or Manual.

          Push ensures that you get an instant notification when you get a new email, whereas Fetch will look for new data 15 minutes, every 30 minutes, hourly or when you launch the Mail app (manually). You may want to disable Push email temporarily for your email accounts to see if it improves battery life.
          Alternatively, if you use multiple email accounts then you may want to disable Push for email accounts where you don’t need to get an instant notification for new email, and switch to Fetch. The higher the fetch interval, the better it is for battery life, so you can set it appropriately based on the importance of the email account.

          3. Background App Refresh

          iOS’ smart multitasking feature lets apps fetch content in the background. Although Apple has made a lot of optimizations to ensure that battery consumption is minimal, it’s possible that poorly developed app can drain battery life due to this feature. To disable Background App Refresh go to Settings > General > Background App Refresh > and turn it off for apps that don’t absolutely need to be updated all the time. Background App Refresh is a great feature, but you don’t need it for every app. I would strongly recommend turning it off for the Facebook app as it is known to drain battery life.


          4. General Tips

          Please note that the tips under section are to highlight areas where you could disable things that are not applicable to you so you can maximize battery life. We are not recommending or advising you to disable features just for battery life, as then there would be no point in using smartphones like the iPhone.

          Remove Unwanted Widgets

          Swipe right from the edge of the Home screen or Lock screen to open Today View. You can add widgets to the Today View to get timely information from your favorite apps, however, they can drain battery life since they fetch data in the background to show up-to-date information. You should review the list and remove the widgets that you don’t want to ensure they don’t consume battery life unnecessarily as some of them could be using Location services.
          Swipe down from the top edge of the screen to access Notification Center. Then swipe to the left to access the Widget tab, scroll down and tap on Edit button. Tap on the red button to remove the widget from the Notification Center.

          Turn off Dynamic Wallpapers

          Dynamic wallpapers bring subtle animations to the Home and the Lock screen. Unfortunately, the animations take up CPU cycles and consume more battery. So if you have set a dynamic wallpaper, and you’re having battery issues, go to Settings > Wallpaper > Choose Wallpaper where you can go to either Stills or your set an image from your photo library as your wallpaper.

          Disable Motion Effects, Parallax

          Apple added a number of animations and physics-based effects to the interface in iOS 7 to help users understand the layered elements in the UI. Some of these effects even access gyroscopic data, which contributes further to battery drain. You can disable these motion effects by going to Settings > General > Accessibility > Reduce Motion and turn on the switch.

          Disable App Store’s Automatic Updates

          App Store automatic installs app updates in the background, but if you’re not too keen on updating all your apps, you can turn this off by going to Settings > iTunes and App Store > scroll down to the Automatic Downloads section and turn off the “Updates” switch. While you’re there, you can also tell iOS to not use cellular data for automatic downloads and iTunes Match streaming.

          Disable unwanted indexing in Spotlight search

          Spotlight searches a lot of types of content like Applications, Contacts, Music, Podcasts, Mails, Events etc., when you might use it only for contacts, applications, and music. So uncheck the type of content you don’t want to search by going to Settings > General > Spotlight Search.

          Turn off Push Notifications

          If you receive a lot of push notifications, your battery can take a hit, so make sure you turn off push for apps that you don’t frequently by navigating to Settings > Notifications > Scroll down to the Include section to see the list of apps and tap on any of them to turn notifications off.

          Other tips

          • If you don’t connect Bluetooth devices to your iPhone then turn it off (Settings -> General -> Bluetooth)
          • Set Auto-Lock interval so that your iPhone will turn off more quickly after a period of inactivity. To set the auto-Lock interval, launch the Settings app, tap on General and then Auto-Lock and set the auto-lock interval to either 30 seconds, 1, 2, 3, 4 or 5 minutes.
          • You’re probably aware that using Wi-Fi drains iPhone’s battery, but perhaps you didn’t know that one of the most intensive processes that iPhone’s Wi-Fi chip has to do is search for available network. So if this happens in regular intervals, it’s going to have a noticeable impact on your battery. To disable this feature, launch the Settings app, tap on Wi-Fi, and tap on the On/Off toggle for Ask to Join Networks to disable it. Please note that by disabling this feature, your iPhone will join known Wi-Fi networks automatically, but you will have to manually select a network if no known networks are available. Note: It is disabled by default.
          • Dimming the screen helps to extend battery life. You can either lower the default screen brightness based on your preference or turn on Auto-Brightness to allow the screen to adjust its brightness based on current lighting conditions. Launch the Settings app, scroll down and tap on Brightness & Wallpaper and set Auto-Brightness to On. Note: Apple enables it by default.
          • Turn off Location services for the following System System services: Diagnostics & Usage, Setting Time Zone, Location Based iAds (Settings -> Privacy -> Location Services -> System Services).

        • 5. Location Services

          When we install apps, they prompt us to give them access to various things such location etc., and we tend to blindly say yes. However, apps using location services can have a major impact on battery life. So you may want to review which apps should have access to your device’s location. The best way to approach this is to first disable location services for all the app. You can disable location services via the Settings app and navigate to Privacy > Location Services. After you’ve disabled location services for all apps, you identify which apps such as navigation apps should use location services and enabled them individually.

          Use Location Only While Using the app

          In iOS, you can allow apps to use Location Services only while using the app, so the apps don’t use it all the time. This can be useful for apps like the App Store, which don’t need to be using location services all the time.
          You can see which applications have recently used location services by going to Settings > Privacy > Location Services. Apps that recently used your location have a purple compass-like indicator next them. Tap on the app, you should see the While Using the App, tap on it if you want the app to use location services only while using the app. This will ensure that the app will access your location only when it or one of its features are visible on the screen. As you can see below, iOS also tells you the App Store app is using location services to “find relevant apps nearby”.   Developers need to add support for this feature, so you may not find this option for all apps. If you’ve accidentally disabled location services for an app that needs to use it, don’t worry, it will prompt you to give access to Location Services when you launch it. I would strongly recommend change the setting to While Using the App for the Facebook app to prevent it from draining battery life.

          6. Place your iPhone Facedown

          iOS includes a new facedown detection feature, which makes use of the ambient light sensor to ensure the display doesn’t light up when you receive a Notification when you place the iPhone facedown. The feature along with other refinements helps in improving battery life by an additional hour as it turns off the display when not in use. So when you place your iPhone on the table, you should place it facedown to conserve battery life. Please note the Facedown Detection feature is available only on iPhone 5s or later devices.

          7. Check Cell Signal

          If you live or work in an area that has poor or no LTE coverage or your carrier doesn’t offer LTE yet, then you should consider switching to 3G to prevent the LTE radio from draining battery life unnecessarily. To switch to 3G, navigate to Settings -> General -> Cellular/Mobile -> Enable LTE/Enable 4G and tap on the Off option.

          8. Use Low Power Mode

          If your device is running low on battery, and you still have some time to get to a power source, then you could enable the all-new Low Power mode by going to Settings > Battery and tapping on the toggle. Low Power Mode temporarily reduces power consumption by turning off or reducing mail fetch, background app refresh, automatic downloads, and some visual effects. Apple states that Low Power Mode mode can extend battery life by an additional 3 hours.  You will also get a prompt to enable Low Power Mode when you hit 20% battery remaining, and will automatically disable it when battery remaining crosses 80%.

          9 Troubleshooting

          Restart/Reset Your iPhone

          Hold down the Sleep/Wake button and the Home button at the same time for at least ten seconds, until the Apple logo appears.

          Resetting Network Settings 

          Reset network settings by tapping Settings -> General -> Reset -> Reset Network Settings. This will reset all network settings, including passwords, VPN, and APN settings.

          Battery Maintenance

          Apple advices users to go through at least one charge cycle per month (charging the battery to 100% and then completely running it down). So if you haven’t done it already, it may be a good time to do it. Power cycling your device helps in recalibrating the battery indicator more accurately.

          10. Restore iPhone as New

          This is not ideal but the last resort. If you’ve setup your iPhone by restoring from backup then the battery life problems could be due to some issue with the backup. Try to restore your iPhone (Settings -> General -> Reset -> Erase All Content And Settings) and set it up as a new iPhone (not from the backup). But before you erase all the contents and settings, take a backup of your iPhone using iTunes or iCloud, or selectively take a backup of your photos and videos using Dropbox or Google+.
          We’ve seen quite a few comments from readers who have found that the battery life is better after setting up the device as a new iPhone/iPad/iPod touch.
          Did you face battery life problems after upgrading to iOS 10? Did any of these tips help? Let us know in the comments.

          Like this post? Share it!


          The History of Apple iPhones: How to fix iPhone battery life in the age of Snapc…

          Apple, Apps, iOS, iPad, iPhon, iPhone, iPhone battery
          How to fix iPhone battery life in the age of Snapchat and Pokémon Go
          As more users spend their days in battery-demanding apps, Apple needs to consider evolving battery life to meet that demand.
           
          So, how can Apple and the iPhone evolve to handle them?

          Assistive Technology Blog: Apple’s New Features For People With Disabilities

          Apple Store, CarriersUpgrading to the iPhone, Chelsea Stark, iPad, iPhon, iPhone, iPhone 6

          Assistive Technology Blog: Apple’s New Features For People With Disabilitiesphoto of a macbook

          Just yesterday, Apple announced several new features that will bring in lots of additional functionality and convenience across all products in this coming fall. However, what are some of the features that can be used by people with disabilities?
          It seems like a lot of new features will enable people who have visual impairment, impaired motor skills, muscular dystrophies/atrophy, and other similar disabilities to interact with the devices just with their voice and get desired results very quickly and efficiently. Using the new features with an additional eye tracking device for those who need it can definitely enhance their experience as well.
          iOS
          iOS for iPhone and iPad get the most features in the upcoming release. By just talking to Siri, a user would be order a ride, send money to someone, order food, and do similar activities.
          iphoen screen showing image of someone composing an email. It displayes Contextual prediction is being introduced which means that iOS will predict what a person is trying to type by making suggestions in various contexts. For example, if someone is typing “I am available today at”, the free time on their calendar will pop up as an option. Similarly, when typing “John’s phone number is”, John’s phone number will be pulled from the address book and displayed as an option.
          Search has been enhanced to use  artificial intelligence. iOS can detect objects in photos, and a user can now search for just the photos that were taken at the beach, for example.
          Apple Pay is coming to various shopping websites so no need to type in a credit card number and other information every time a user goes to a shopping website. Purchases can now be made with just a click of a button in a secure manner.
          WatchOS
          In the upcoming release, apps will load much faster. A user would also be able to add minutes to a parking meter, order their food, and make other similar purchases using Apple Pay on their watch. 
          The fitness aspect of the watch has included a wider audience now – wheelchair users! Wheelchair users will be able to track their physical activity through various pushing techniques for various speeds and terrains. Wheelchair specific workouts have now been included, and notifications will be sent every hour for “time to roll” when a person has been sitting and not moving for a long time, to encourage them to be active.
          Pressing the side button initiates a call with local emergency services anywhere in the world. It can also be used to send a quick text to a user’s emergency contacts.
          Wearing an Apple Watch will also work as an authentication mechanism for a user’s Mac. When a user wearing an Apple Watch approaches their Mac, the Mac senses their presence and logs them in automatically. No need to type the password for  unlocking the computer.
          The new “Home” app will also let users control connected (Internet of Things) devices around the house using their phone, tablet, watch or TV. Location based automation can also be set up using the Home app – if a user is approaching the house, turn on the lights, pull up the blinds, and set the thermostat to 68 degrees.

          MacOS (formerly OS X)
          Siri is now coming to Mac. Siri can locate files for a user (“Show the pdfs in my Downloads folder”, “Show my photos from yesterday”), add and modify events (“Add Laura to my 10 AM meeting”), search for images from the internet (“Show me images of Lake Tahoe”), play music, check weather, and do lots of other things.

          These are some of the features that people with disabilities can use that will make things easier for them. We should hopefully see a full list of accessibility features from Apple in the near future.

          Source: Apple

          Image Sources: Appleacross all pro…

          iPad & iOS9 Accessibility Features Part2

          Accessibility, Apple Vis, Blind, iOS, iPhon, iPhone, Low vision

          Guided Access

          Guided Access screenshotGuided Access is a way to set certain parts of your screen off limits. Are you using a free app with ads and your child keeps clicking the ads? Just draw a square around those ads and suddenly they aren’t clickable anymore! Guided Access has not changed since the iOS8 updates, but is definitely a feature worth mentioning for kids with motor challenges or just learning to use the iPad!
          Here’s how it works: Go to Settings > General > Accessibility and turn Guided Access on. You can set a passcode at this point if you want to (make it something easy, like 1-2-3-4) or you can do it later when you use the feature. You’ll need the passcode to turn Guided Access off.
          Now when you’re in your app (I’m going to use Talking Tom as my example), triple click the home button to open up your Guided Access options. Draw a box around the areas you don’t want your child to access (for Talking Tom, I drew a box around the ad at the top of the screen and the buttons that ask you to buy things on the right of the screen). Click start and you’re back in the app, but now those areas are not accessible. Those areas are also grayed out a bit so they are less likely to draw your child’s attention, too. Another hint is to make sure that you do not draw a box in the middle of the screen where you will need to enter your passcode to turn Guided Access off later!
          You can also use Guided Access to set a time limit on apps. Are you using iPad play as a reward, but want your child to get back to another task in 10 minutes? Set Guided Access to 10 minutes and when the time is up, the session will end and you’ll have to use a passcode to get the iPad up and running again.
          When you’re done using Guided Access, triple click the home button again and enter your passcode or place your finger on the Touch ID. Easy!

          Switch Control

          Switch access for the iPad allows users to interact with one or two large buttons rather than have to maneuver through the complexities of the touch screen. The iPad has always been switch accessible, particularly with apps designed specifically for switches, but starting in iOS7 the iPad now allows for complete system-wide switch control.
          Go to Settings > General > Accessibility > Switch Control to turn Switch Control on. You can then tell the iPad how many switches you wish to use and you can fully customize how the switches interact with the iPad, from changing the cursor speed, size and color to adding sound effects and speech options (which is perfect for children who are visually impaired). A feature new to iOS9 is Recipes. A Recipe is a set of specialized actions you can temporarily assign to switches in place of their normal actions. Need to record a series of gestures to perform a complex action in an app? You can make it happen with a Recipe. You can also create a customized Launch Recipe that will be applied automatically whenever Switch Control starts.
          For more information on Switch Control, check out this post from Assistive Technology Blog or this very in-depth piece (which includes screenshots and videos) from Jane Farrall’s Blog. To learn more about the specific iOS9 updates, read this guide from AbleNet, “iOS9 Accessibility Switch Control – The Missing User Guide.”
          If you’re looking to purchase switches, AbleNet sells a Bluetooth iPad switch that allows you to use either one or two built-in switches or even attach your own favorite switch. There is also the Bluetooth Switch Interface from RJ Cooper. Also, Inclusive Technology creates a series of fun and educational iPad apps that are designed specifically to work with a switch.

          Head Gestures & Other Switch Options

          Another really interesting feature of the iPad is the ability to do everything a switch allows you to do… but without a switch! Go toSettings > General > Accessibility > Switch Control > Switches > Add New Switch. You have three options here: “External” allows you to hook up a traditional external switch with your iPad; “Screen” lets you use the whole iPad screen as your switch; and “Camera” lets you use head gestures (a move of the head to the left or the right) as your switch. Isn’t that neat?
          So with “Screen” you can use your iPad just like you would when using a switch, but the touch screen itself acts as a large interactive switch.
          And with “Camera” you control the cursor on the screen with a move of your head from left to right. You get to choose which movements control which features in the settings. For more information and a walk through on using head gestures to control the iPad, watch this video below:

          Low Vision Options

          button shapes screenshot
          Go to Settings > General > Accessibility and you have a few options to change the way your screen looks. You can Zoom to magnify the entire screen. It takes a somewhat complicated move (once turned on in your settings, you need to double-tap with three fingers in order to zoom in), but if you can help you child learn to control the zoom it can be a really powerful tool (unfortunately AssistiveTouch doesn’t seem to be able to pull off the three-fingered double tap for you).
          In iBooks it’s a terrific way of showing a child with low vision what the illustrations are and because of how sweetly it functions, you or your child can move through the pictures smoothly, enlarged as required, to find out things like how sad Eyore’s face looks or how big Pooh’s tummy is.
          button shapes screenshotThe Zoom feature underwent a pretty major upgrade in iOS8. Once turned on, you can choose to magnify the entire screen (which is the default setting) or create a Window Zoom. Go to Settings > General > Accessibility > Zoom > Zoom Region and choose Window Zoom. Now, instead of enlarging the entire screen with your three-fingered double tap, you’ll just see a zoom lens (sort of like using a magnifying glass on your iPad) so you can zoom in on specific areas of the screen. If you also turn on the Zoom controller (Settings > General > Accessibility > Zoom > Show Controller), you can control the power of the zoom, resize your lens or even add filters. So now, you could create a lens that zooms and gives you a higher contrast! Wow!
          In the same area in your settings, you can also Invert Colors (for more contrast) or turn on Larger Text (to increase just the text font size). You can also turn on Bold Text under Accessibility options. This creates bold text in apps, the keyboard and the calculator (not just in eBooks). There’s also an option to turn on Button Shapes, which highlights buttons and links throughout the iPad or iPhone making them much easier to see, or you can choose the Grayscale option, giving you another way to make the screen clearer for users with low vision.