Hands-on with the 9.7-inch 2018 6th-generation iPad featuring Apple Pencil support. Review: https://wp.me/p1xtr9-2d7q Should you consider it? Pre-order at B&H + free shipping/no tax: https://goo.gl/H4zQuA
ipod
Battery life with iOS 10
Accessibility, Apple, Blind, iOS, iPad, iPad Air, iPhon, iPhone, ipod, iPod touch, Live video event, Low vision, Low vision aids, OS X
If you’ve upgraded your iPhone, iPad or iPod touch to iOS 10, and are facing battery life problems then check out the tips after the break to see if they help in fixing the problem.
iOS 10 comes with a number of new features such as major updates to the Messages app, new Home app, all-new Photos, Music and News apps, Siri integration with some types of third-party apps, VoIP calls integration in the Phone app, and lots more. So it is possible that features such as
The problem with battery life issues is that it is very subjective as it is based on your usage pattern, so it is difficult to pinpoint what exactly is causing a problem.
Note: I’ve noticed that people are quite cynical about such articles as most of them tell you to disable features. The aim of the article is not to tell you to disable features on your iPhone, but the purpose is to provide you information about the various settings that are available, so you can disable the features that you don’t use as it would help in extending your iPhone’s battery life.
Restore from an iCloud backup
Apple, iOS, iPad, iPad Air, iPhone, ipod, UncategorizedHow to wipe iPad and iPhone back to factory settings: erase all your content

Factory reset your iPhone or iPad and remove all personal data

Delete your data, apps, music, photos and more from your iPhone or iPad
Whether you’re handing over your old iPhone or iPad to a family member, or selling it on in order to upgrade (maybe you just bought an iPad Air or iPhone 5S) you should reset it to delete your accounts – including your Apple ID, Facebook, ebay, email and other accounts – and remove all your content including apps, photos and music.
The same goes for when you need to take it in for repair or replacement with Apple. Of course, before you reset your device, you should make a full backup as you might otherwise lose data.
Even if you use iCloud, it’s sensible to make a full backup by connecting your iPad or iPhone to your computer, waiting for it to show up in iTunes (the current version is 11.1), and then clicking on it. It should open the Summary screen, where you’ll see a Backups section. Simply click the Back Up Now button.
Once that’s done, you can begin the wipe proces. It’s also worth remembering to remove your SIM card before you pass on the iPhone or iPad on, as this may have information stored on it, and you might want to continue using it in a new handset or tablet.
We’ve used and iPad running iOS 7, reviewed, but it’s exactly the same on an iPhone and there’s no difference in the steps if your deivce is still running iOS 6.
Step 1.
Tap Settings, then General. Scroll down until you see Reset.
 Step 2.
Tap Erase All Content and Settings. Depending on whether you’ve set a Passcode and / or a Restrictions Passcode (they are different) you might have to enter that code or password in order to erase and reset it.
Step 2.
Tap Erase All Content and Settings. Depending on whether you’ve set a Passcode and / or a Restrictions Passcode (they are different) you might have to enter that code or password in order to erase and reset it.
 If you’ve enabled restrictions (as you should have done if you set up Find my iPhone correctly), you will need to enter your passcode for this as well:
 Step 3.
Just in case you tapped the button by accident, your iPhone or iPad will ask you to confirm the reset, and when you tap OK it will start the process. This can take a minute or two, after which you’ll see the welcome screen that you see on any new iDevice running iOS 5, 6 or 7. It’s then ready to be sold on or taken to an Apple Store for repair.
Step 3.
Just in case you tapped the button by accident, your iPhone or iPad will ask you to confirm the reset, and when you tap OK it will start the process. This can take a minute or two, after which you’ll see the welcome screen that you see on any new iDevice running iOS 5, 6 or 7. It’s then ready to be sold on or taken to an Apple Store for repair.
 Note that, if you’re merely having a problem where your iPad or iPhone has frozen for some reason, you can hold down the power and home buttons to do a soft reset (a reboot). This type of reset doesn’t delete and apps or data.
Delete your data, apps, music, photos and more from your iPhone or iPad
Whether you’re handing over your old iPhone or iPad to a family member, or selling it on in order to upgrade (maybe you just bought an iPad Air or iPhone 5S) you should reset it to delete your accounts – including your Apple ID, Facebook, ebay, email and other accounts – and remove all your content including apps, photos and music.
The same goes for when you need to take it in for repair or replacement with Apple. Of course, before you reset your device, you should make a full backup as you might otherwise lose data.
Even if you use iCloud, it’s sensible to make a full backup by connecting your iPad or iPhone to your computer, waiting for it to show up in iTunes (the current version is 11.1), and then clicking on it. It should open the Summary screen, where you’ll see a Backups section. Simply click the Back Up Now button.
Once that’s done, you can begin the wipe proces. It’s also worth remembering to remove your SIM card before you pass on the iPhone or iPad on, as this may have information stored on it, and you might want to continue using it in a new handset or tablet.
We’ve used and iPad running iOS 7, reviewed, but it’s exactly the same on an iPhone and there’s no difference in the steps if your deivce is still running iOS 6.
Step 1.
Tap Settings, then General. Scroll down until you see Reset.
Step 2.
Tap Erase All Content and Settings. Depending on whether you’ve set a Passcode and / or a Restrictions Passcode (they are different) you might have to enter that code or password in order to erase and reset it.
If you’ve enabled restrictions (as you should have done if you set up Find my iPhone correctly), you will need to enter your passcode for this as well:
Step 3.
Just in case you tapped the button by accident, your iPhone or iPad will ask you to confirm the reset, and when you tap OK it will start the process. This can take a minute or two, after which you’ll see the welcome screen that you see on any new iDevice running iOS 5, 6 or 7. It’s then ready to be sold on or taken to an Apple Store for repair.
Note that, if you’re merely having a problem where your iPad or iPhone has frozen for some reason, you can hold down the power and home buttons to do a soft reset (a reboot). This type of reset doesn’t delete and apps or data.
iOS 8 Accessibility Roundup: More Accessible Than Ever
Accessibility, Apple, Apps, Blind, iOS, iPad, iPad Air, IPAD AIR 2, iPad mini, iPad mini 4, iPhone, iPhone 6, iphone6, ipod, mac, UncategorizediOS 8 builds on existing accessibility features to offer some exciting new possibilities for iOS users with disabilities. Many websites will have general information about iOS 8, but this post will focus on accessibility related changes to iOS. iOS 8 includes new keyboard options, improved text-to-speechvoices, improved Guided Access features, and improved Siri functionality among other accessibility related features. Apple can always add or alter features before the general release. The new operating system will be available this fall for the general public.
QuickType and Keyboard
Apple’s iOS 8 will include a built in predictive keyboard called QuickType. This new software keyboard will predict words for the user as they type. Once the word you want to enter appears in the suggestion bar above the keyboard, you simply tap it to insert that word. This feature will cut down on key strokes needed to enter words which will benefit people with dexterity challenges. QuickType even takes context into account so if your typing an email it will suggest more formal language that if you are writing a text message. QuickType will be similar to the Co:Writer app, but will work across all apps on your devices.
In addition to Apple’s own QuickType keyboard, iOS 8 will allow third-party developers to develop keyboards for system wide use. For example, Fleksy could be updated to work with every app on the iPhone or iPad. This flexibility gives users with different abilities the opportunity to switch keyboards to one that fits their needs. For users who are blind or visually impaired downloading the fast and accessible Fleksy keyboard may allow them to more easily enter text.
Health
iOS 8 takes big steps to help people manage data associated with their health. Users can input data into the health app through third-party health monitoring devices like a blood pressure reader or through apps. This data can then be automatically shared with doctors and other health care professionals to help insure timely and appropriate care. For instance, if a blood pressure or glucose reading was outside of a normal range, a doctor could be automatically alerted. This could help people with chronic conditions live more independently especially in their later years.
The health app will include another life saving feature called “in case of emergency card.” This information card will be accessible from the lock screen and will allow first responders and emergency room doctors important health information in the case of an emergency. The card can include a photo, medical conditions, allergies, current medications, and more all to give life saving information to emergency medical personnel.
Family Sharing
Family sharing will allow families with multiple iOS 8 devices to manage their iOS devices more harmoniously. Parents will be able to set up home sharing to monitor their child’s physical location or to share purchased content from the iTunes store among members of the family. Children will also have to ask parents permission before purchasing an app.
Spotlight Search
Spotlight search is an existing feature in iOS 7, but in iOS 8 it gets supercharged. Spotlight in iOS 8 will give Siri-like answers. Unlike Siri, which uses voice input, spotlight uses text input. This new form of input gives users with speech impairments the ability to type, instead of speak, queries and get meaningful results.
Touch ID
iOS 8 improves Touch ID by allowing third-party apps to unlock information using just a user’s fingerprint. Touch ID is currently used for unlocking your device and making iTunes purchases. This feature already is great for blind users because it offers secure authentication without having to type, which can be a slower process with VoiceOver. In iOS 8, the ability to access third-party apps with just a finger print will expand on the already very accessible Touch ID feature of iOS 7.
Siri
iOS 8 will also bring improvements to Siri. Most notably, users will be able to activate Siri hands-free by saying “Hey, Siri.” This new hands-free voice command may benefit people that have trouble activating the home button. This always listening feature is similar to Google’s advanced voice search.
iOS 8 will also offer faster dictation that appears on screen as you speak. This new feature will prusumably work with Siri and in app dictation.
Much More

iOS 8 will also include features that Apple did not have time to fully preview during their keynote. The first one included in the keynote was “Braille Keyboard for direct 6-dot Braille input.” Other accessibility related features include the ability to use the advanced and high quality Alex voice. The Alex voice is currently available for the Mac and many users enjoy its high quality. iOS 8 will also include improved zoom for accessibility, but no further details on this feature where offered.
iOS 8 will also include some enhancements to Guided Access. Guided Access is a feature that locks a user into a single app. This is great for teachers administering tests on an iPad or parents of kids who are easily distracted. In iOS 8, users will be able to use Touch ID to exit from Guided Access. Users will also be able to use time limits and countdown timers to control Guided Access.
Another feature listed is “Speak screen,” a somewhat mysterious feature than did not garner any further explanation from Apple. Speak screen may be a brand new accessibility feature or maybe unrelated to accessibility, but the name seems to imply some link to accessibility.
Keep your notes secure with password-protection
Apple, Apple ID, CarriersUpgrading to the iPhone, iOS, iOS 10, iPad Air, iPhon, iPhone, iPhone 6, ipod, iPod touch, notesYou can secure the notes that contain your most personal data—such as financial details, medical info, or website logins—with a password or fingerprint.
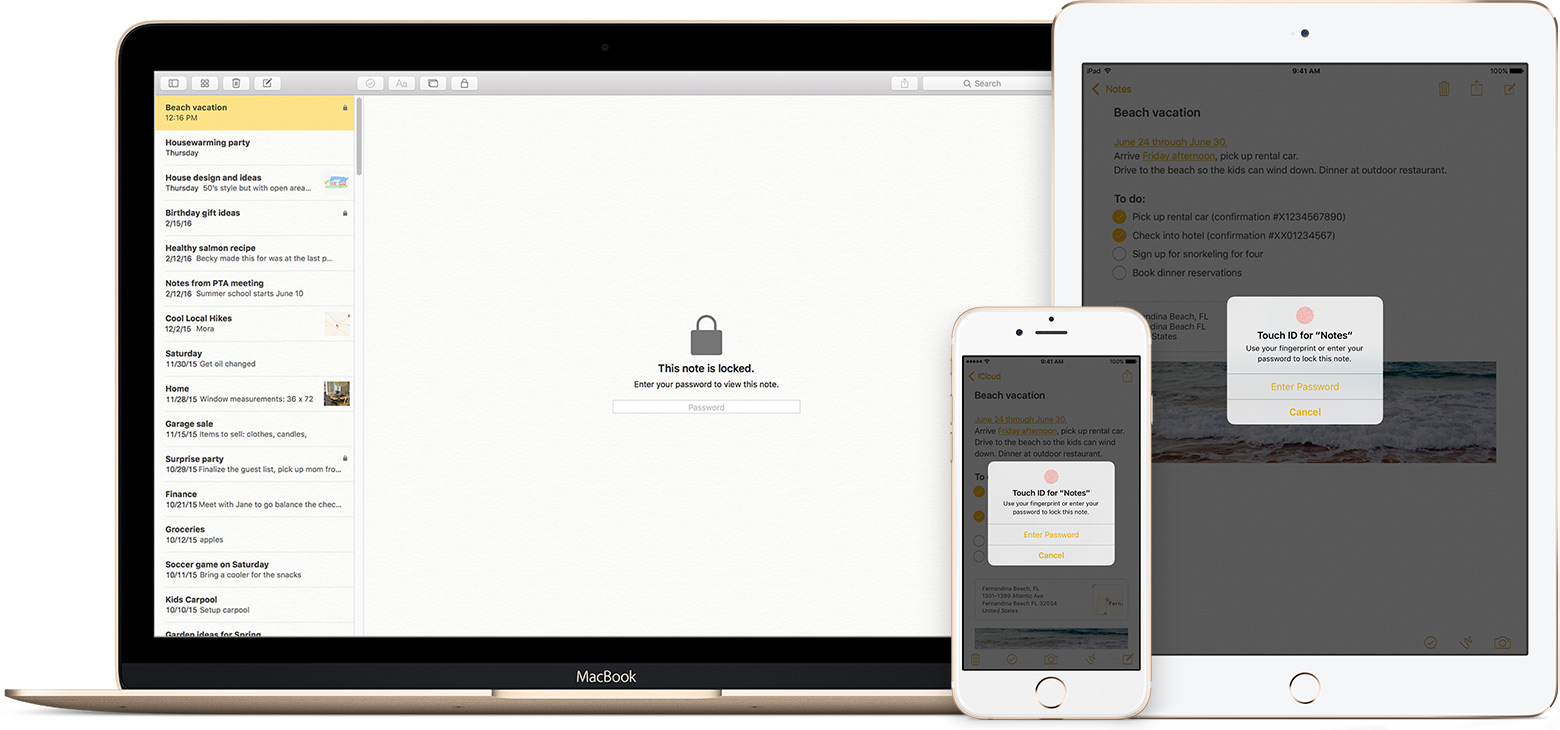
The Notes app lets you lock any note that you want to keep private from anyone else that might use your device. Notes uses a single password for all of the notes that you want to protect, on all of your devices. And if you have an iPhone or iPad with Touch ID, you can use your fingerprint to open your locked notes.
Before you begin
- Update your iPhone, iPad, or iPod touch to iOS 9.3 or later, and your Mac to OS X 10.11.4 or later.
- Make sure that you upgrade your notes.

Set up your notes password
Before you can lock your notes, create a password that you can easily remember. If you’re concerned about forgetting your password, make sure that you give yourself a password hint and that you set up Touch ID. If you forget your password, Apple can’t help you reset it.
If you access your iCloud notes on more than one Apple device, you’ll use the same notes password to lock and unlock all of them.
On your iPhone, iPad, or iPod touch
You can create a password in your device Settings or directly in the Notes app. Then you can turn on Use Touch ID on your iPhone or iPad, so that you can use your fingerprint to unlock your protected notes.
Create a password in Settings
- Go to Settings > Notes.
- Tap Password.
- Enter a password, then give yourself a password hint.
- Tap Done.
Create a password in Notes
- Open a note that you want to lock.
- Tap
 > Lock Note.
 - Enter a password, then give yourself a password hint.
- Tap Done.
On your Mac
You can create a password on your Mac directly in the Notes app. In the menu bar, click Notes > Set Password. Enter a password, then give yourself a password hint and click Done.
Use Notes password-protection
Whether your note has an image, sketch, map, URL, or list of important information, it’s simple to keep it safe with password-protection. And when you need to access your secure notes, you can tell which ones are locked directly from the Notes list. Just look for the  next to the note. Until you enter your password or use Touch ID, you only see the title and the last date that it was edited.
You can’t password-protect notes that you share with someone else. If you want to stop sharing a note, open  , then tap or click Stop Sharing.
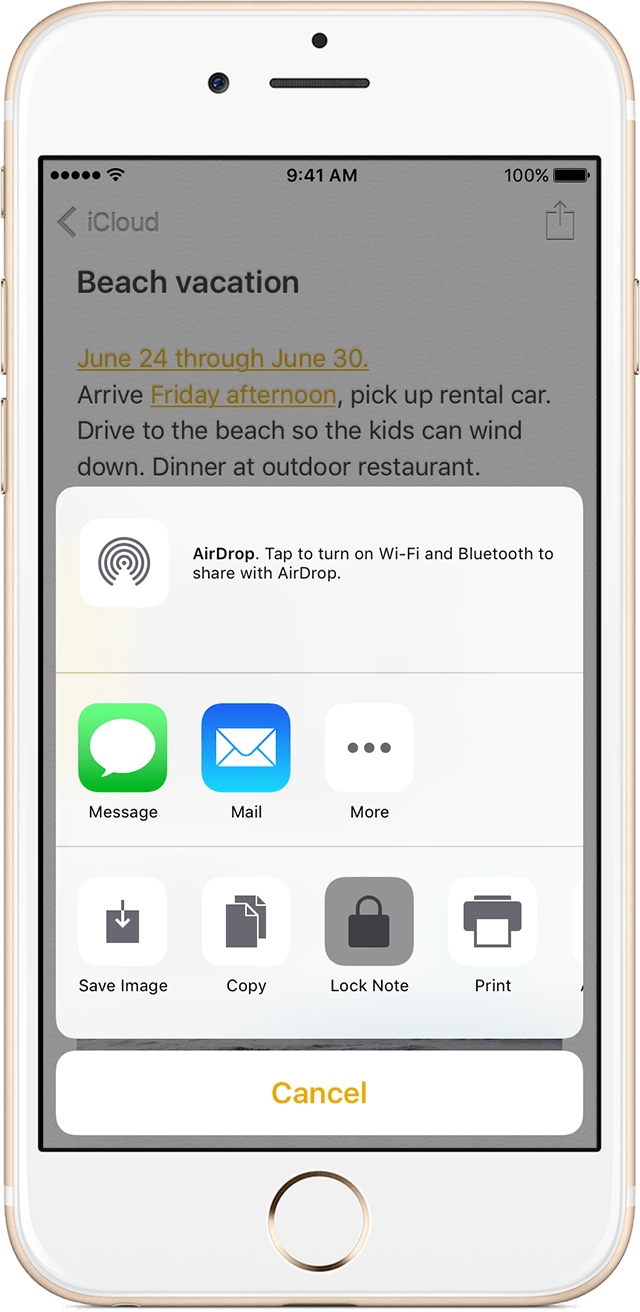
Lock a note
On your iPhone, iPad, or iPod touch:
- Open the note that you want to lock.
- Tap .
- Choose Lock Note.
After you lock your note, it stays open and you’ll see  at the top of the screen. You can hide the note’s contents when you tap .
On your Mac:
- Open the note that you want to lock.
- Click
 .
. - Choose Lock Note.
You can only lock notes on your device and notes in iCloud. You can’t lock notes that have PDFs, audio, video, Keynote, Pages, Numbers documents, or notes that use IMAP to sync (like Yahoo!, Gmail, and Hotmail).
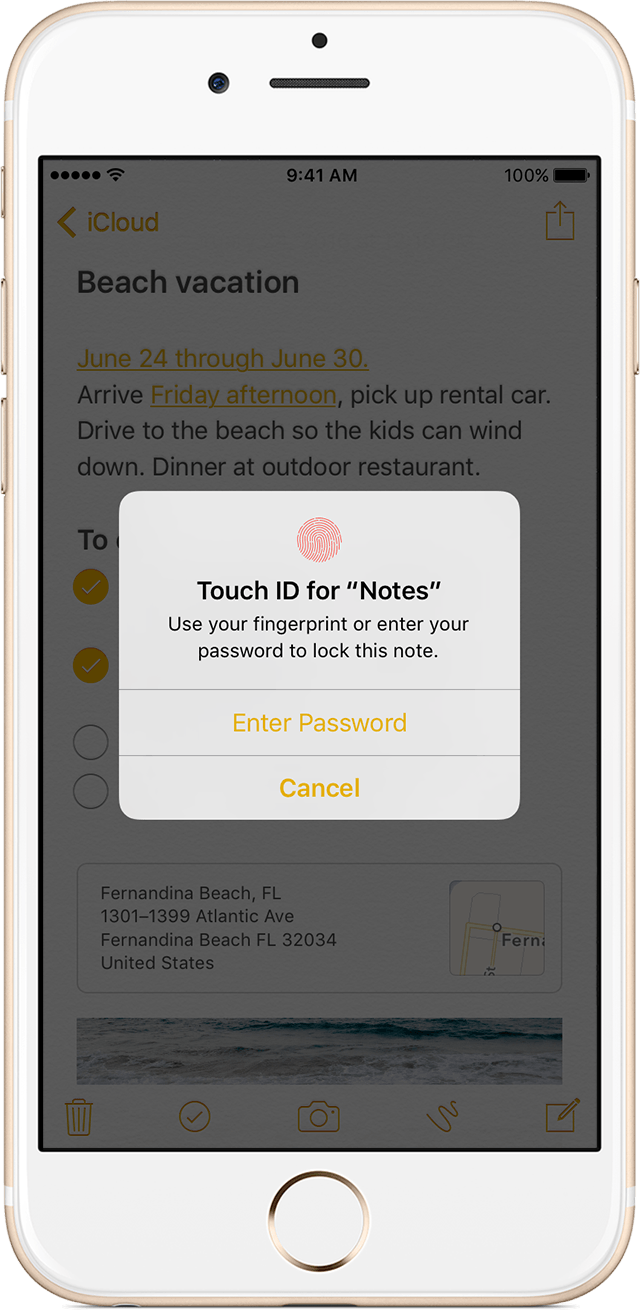
Open a locked note
On your iPhone, iPad, or iPod touch:
- Tap the locked note.
- Tap View Note.
- Enter your password or use Touch ID.
On your Mac and iCloud.com:
- Click the locked note.
- Enter your password.
Your locked notes stay open for up to three minutes, making it easy for you to jump to another note, copy and paste information from other apps, and more. If you close the Notes app or your device goes to sleep, the note locks again.

Remove a lock
On your iPhone, iPad, or iPod touch:
- Tap the locked note.
- Enter your password or use Touch ID.
- Tap .
- Choose Remove Lock.
On your Mac:
- Click the locked note.
- Enter your password.
- Click .
- Choose Remove Lock.
When you remove a lock from a note, it’s removed on all of the devices that you’re signed in to with the same Apple ID.
Change your password
On your iPhone, iPad, or iPod touch:
- Go to Settings > Notes > Password.
- Tap Change Password.
- Enter your old password, then enter a new password and password hint.
On your Mac:
- Open Notes.
- In the menu bar, choose Notes > Change Password.
- Enter your old password, then enter a new password and password hint.
- Click Change Password.
If you forgot your notes password
You can unlock a note only when you enter the password that it’s locked with. If you forgot your password, Apple can’t help you regain access to your locked notes.
You can reset your password, but this won’t give you access to your old notes. It will, however, let you password protect any notes that you create from that point forward with the new password. This could lead to you having multiple notes with different passwords.
If you have multiple passwords, you can’t tell which password you should use when you look at your notes in the Notes list. When you open a note locked by your old password but enter your current password, you’ll see an alert that you entered the wrong password with a hint for your old one. If you then enter the correct old password, you get the option to update that note’s password to your current one.
Reset your notes password
When you reset your Notes password, it doesn’t delete or change the password of your notes that are already locked. If you have a note that uses an old password, you can update it to the new password when you enter the old password, remove the old password, then apply your new password to the note.
On your iPhone, iPad, or iPod touch:
- Go to Settings > Notes > Password.
- Tap Reset Notes Password.
- Enter your Apple ID password.
- Tap Reset Notes Password again.
- Enter your new password and password hint.
On your Mac:
- Open Notes.
- In the menu bar, click Notes > Reset Password > OK.
- Enter your Apple ID password.
- Click Reset Password.
- Enter your new password and password hint.
Be My Eyes – helping blind see app
Accessibility, Apple, Be My Eyes, Blind, iOS, iPhone, ipod, iPod touch, Low vision, peopleBe My Eyes is an app that connects blind and visually impaired with sighted helpers from around the world via live video
Voiceover for iOS let voiceover be your guide
Accessibility, Apple, Apps, Blind, iOS, ios8, iPad, iPhon, iPhone, iphone1g, ipod, Siri, text, voiceover
-
Braille Displays

VoiceOver is a gesture-based screen reader that lets you enjoy the fun and simplicity of iOS even if you can’t see the screen. With VoiceOver enabled, just triple-click the Home button to access it wherever you are in iOS. Hear a description of everything happening on your screen, from battery level to who’s calling to which app your finger’s on. You can adjust the speaking rate and pitch to suit you.
With VoiceOver, you’ll use a simple set of gestures to control your iOS device. For example, touch or drag your finger around the screen and VoiceOver tells you what’s there. Tap a button to hear a description; double-tap to activate. Swipe up or down to adjust a slider. Flick left and right to move from one app to the next. When you interact with an element on the screen, a black rectangle appears around it, so sighted users can follow along. When you prefer privacy, you can activate a screen curtain to turn off the display so no one can see it, even as you’re controlling it. And when VoiceOver is talking, the volume of any background audio from music or video automatically lowers, “ducking” under the voice, so you can hear VoiceOver clearly.
Whether you’re composing an email or jotting a note, VoiceOver echoes each character on the keyboard as you touch it, and again when you enter it. Have VoiceOver speak each completed word. A flick up or down moves the cursor so you can edit precisely. To help you type more quickly and accurately, iOS supports multiple character inputmethods — including handwriting — and corrects misspelled words. Enable Speak Auto-text and you hear a sound effect and the suggested word spoken. Keep typing to ignore it, or tap the space bar to have your iOS device type it for you. Pair up an Apple Bluetooth keyboard, and VoiceOver talks you through inputting text in the same way
Apps

Because VoiceOver is integrated in iOS, it works with all the built-in apps, including Safari, Mail, App Store, iTunes, Music, Calendar, Reminders, and Notes. You can also create custom labels for buttons in any app — including third-party apps. So it’s even easier to get to your news, word games, or anything else you love on your iOS device. And Apple is working with the iOS developer community to make even more apps compatible with VoiceOver.
Learn more about how third-party apps can support VoiceOver
VoiceOver includes built-in voices that speak over 30 languages: English (U.S.), English (UK), English (Australia), English (Ireland), English (South Africa), Spanish (Mexico), Spanish (Spain), French (France), French (Canada), German, Italian, Japanese, Korean, Mandarin (Mainland China), Mandarin (Taiwan), Cantonese (Hong Kong), Arabic, Czech, Danish, Dutch, Finnish, Flemish (Belgium), Greek, Hindi, Hungarian, Indonesian, Norwegian, Polish, Portuguese, Portuguese (Brazil), Romanian, Russian, Slovak, Swedish, Thai, and Turkish.
VoiceOver for OS X
Once you learn how to use VoiceOver on your iOS device, you can easily use the same gestures on a Mac. In OS X, VoiceOver allows for gesture-based navigation using the trackpad and supports multiple braille displays. And it features Alex, the voice of Mac, which closely matches how people naturally talk. Learn more about VoiceOver for OS X
What you should do before selling an iOS 7 device (iPhone/iPad/iPod touch)
Accessibility, Apple, Apple Vis, I Clod, iOS, IOS 8, ios8, iPad, iPhon, ipod, iPod touch, OS XIf you still have your iOS device
Before you sell or give away your iOS device, make sure that you’ve removed all of your personal information. Follow these steps to protect your data and get your device to its factory default state for the new owner:
Back up your Device
Back up your device Use iTunes On Your Computer.
Use iCloud
iCloud Backup provides an easy and reliable backup solution for customers who want to back up their iOS devices wirelessly and automatically.
Back up to iCloud
If you’re using iCloud, it can automatically back up your data if you’ve chosen this option. You can verify your iCloud backup and make sure that it’s up to date by following these steps:
- Tap Settings > iCloud > Storage & Backup.

- Turn on iCloud Backup if it’s off.
- Tap Back Up Now
AllAccess.US: Scan Logos, Access Menus, Deals & More!
Accessibility, Apps, Blind, help, iOS, iPad, iPhone, iphone6, ipod, iPod touch
How to Delete An iCloud Account from iPhone/iPad in iOS 8
I Clod, IOS 8, iPhone, ipod, macDeleting/removing your iCloud account from your iPhone/iPad has changed a tiny bit in iOS 8. While all processes remain the same, Apple changed the button labels. Instead of Delete, you now have Sign out.
For those of you who are new to the iOS ecosystem and would like to know how to delete the iCloud account from your iPhone/iPad, this post should be helpful. Dive in.

w to Delete iCloud account on your iPhone/iPad Running iOS 8: Open Settings
Tap on iCloud
Scroll way down and tap on Sign out

- Tap on Sign out in the alert message

- Now, you’ll see the Delete Account alert.

- If you want to keep all Safari reading list/bookmarks/saved pages data on your iDevice (or if you want to keep all the contacts on the iPhone/iPad), make sure you tap on Keep on my iPhone/iPad.
- If you don’t want to keep all that data, you can tap on Delete from My iPhone/iPad.
