Guided Access is a way to set certain parts of your screen off limits. Are you using a free app with ads and your child keeps clicking the ads? Just draw a square around those ads and suddenly they aren’t clickable anymore! Guided Access has not changed since the iOS8 updates, but is definitely a feature worth mentioning for kids with motor challenges or just learning to use the iPad!
Here’s how it works: Go to Settings > General > Accessibility and turn Guided Access on. You can set a passcode at this point if you want to (make it something easy, like 1-2-3-4) or you can do it later when you use the feature. You’ll need the passcode to turn Guided Access off.
Now when you’re in your app (I’m going to use Talking Tom as my example), triple click the home button to open up your Guided Access options. Draw a box around the areas you don’t want your child to access (for Talking Tom, I drew a box around the ad at the top of the screen and the buttons that ask you to buy things on the right of the screen). Click start and you’re back in the app, but now those areas are not accessible. Those areas are also grayed out a bit so they are less likely to draw your child’s attention, too. Another hint is to make sure that you do not draw a box in the middle of the screen where you will need to enter your passcode to turn Guided Access off later!
You can also use Guided Access to set a time limit on apps. Are you using iPad play as a reward, but want your child to get back to another task in 10 minutes? Set Guided Access to 10 minutes and when the time is up, the session will end and you’ll have to use a passcode to get the iPad up and running again.
When you’re done using Guided Access, triple click the home button again and enter your passcode or place your finger on the Touch ID. Easy!
Switch Control
Switch access for the iPad allows users to interact with one or two large buttons rather than have to maneuver through the complexities of the touch screen. The iPad has always been switch accessible, particularly with apps designed specifically for switches, but starting in iOS7 the iPad now allows for complete system-wide switch control.
Go to Settings > General > Accessibility > Switch Control to turn Switch Control on. You can then tell the iPad how many switches you wish to use and you can fully customize how the switches interact with the iPad, from changing the cursor speed, size and color to adding sound effects and speech options (which is perfect for children who are visually impaired). A feature new to iOS9 is Recipes. A Recipe is a set of specialized actions you can temporarily assign to switches in place of their normal actions. Need to record a series of gestures to perform a complex action in an app? You can make it happen with a Recipe. You can also create a customized Launch Recipe that will be applied automatically whenever Switch Control starts.
If you’re looking to purchase switches, AbleNet sells a Bluetooth iPad switch that allows you to use either one or two built-in switches or even attach your own favorite switch. There is also the Bluetooth Switch Interface from RJ Cooper. Also, Inclusive Technology creates a series of fun and educational iPad apps that are designed specifically to work with a switch.
Head Gestures & Other Switch Options
Another really interesting feature of the iPad is the ability to do everything a switch allows you to do… but without a switch! Go toSettings > General > Accessibility > Switch Control > Switches > Add New Switch. You have three options here: “External” allows you to hook up a traditional external switch with your iPad; “Screen” lets you use the whole iPad screen as your switch; and “Camera” lets you use head gestures (a move of the head to the left or the right) as your switch. Isn’t that neat?
So with “Screen” you can use your iPad just like you would when using a switch, but the touch screen itself acts as a large interactive switch.
And with “Camera” you control the cursor on the screen with a move of your head from left to right. You get to choose which movements control which features in the settings. For more information and a walk through on using head gestures to control the iPad, watch this video below:
Low Vision Options
Go to Settings > General > Accessibility and you have a few options to change the way your screen looks. You can Zoom to magnify the entire screen. It takes a somewhat complicated move (once turned on in your settings, you need to double-tap with three fingers in order to zoom in), but if you can help you child learn to control the zoom it can be a really powerful tool (unfortunately AssistiveTouch doesn’t seem to be able to pull off the three-fingered double tap for you).
In iBooks it’s a terrific way of showing a child with low vision what the illustrations are and because of how sweetly it functions, you or your child can move through the pictures smoothly, enlarged as required, to find out things like how sad Eyore’s face looks or how big Pooh’s tummy is.
The Zoom feature underwent a pretty major upgrade in iOS8. Once turned on, you can choose to magnify the entire screen (which is the default setting) or create a Window Zoom. Go to Settings > General > Accessibility > Zoom > Zoom Region and choose Window Zoom. Now, instead of enlarging the entire screen with your three-fingered double tap, you’ll just see a zoom lens (sort of like using a magnifying glass on your iPad) so you can zoom in on specific areas of the screen. If you also turn on the Zoom controller (Settings > General > Accessibility > Zoom > Show Controller), you can control the power of the zoom, resize your lens or even add filters. So now, you could create a lens that zooms and gives you a higher contrast! Wow!
In the same area in your settings, you can also Invert Colors (for more contrast) or turn on Larger Text (to increase just the text font size). You can also turn on Bold Text under Accessibility options. This creates bold text in apps, the keyboard and the calculator (not just in eBooks). There’s also an option to turn on Button Shapes, which highlights buttons and links throughout the iPad or iPhone making them much easier to see, or you can choose the Grayscale option, giving you another way to make the screen clearer for users with low vision.
Born legally blind, the 20-year-old Rath says he was severely bullied as a child and had difficulty learning. He attempted suicide when he was 11 years old, and was diagnosed with depression at the same age.
But when he got his first MacBook Pro on his 14th birthday, he found that the computer’s accessibility features allowed him to see things he otherwise wouldn’t have been able to see. He could read his schoolbooks and zoom in on software that allowed him to edit video.
“My whole outlook on life changed after I got my first Mac,” Rath told CNNMoney. “I stopped doubting myself.”
Before you sell or give away your iOS device, make sure that you’ve removed all of your personal information. Follow these steps to protect your data and get your device to its factory default state for the new owner:
iCloud Backup provides an easy and reliable backup solution for customers who want to back up their iOS devices wirelessly and automatically.
Back up to iCloud
If you’re using iCloud, it can automatically back up your data if you’ve chosen this option. You can verify your iCloud backup and make sure that it’s up to date by following these steps:
Now that you’ve taken your first step into the iOS world with multitouch gestures, it’s time to learn how to navigate your device. We’ll go over where your apps are stored, how to organize them, search for them, and delete them.
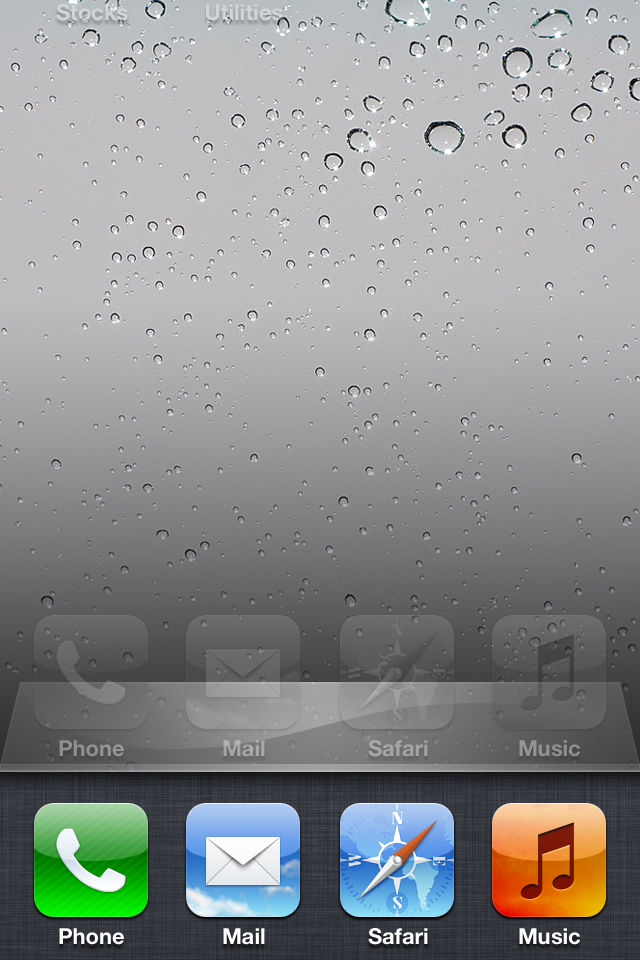
The Home screen: When you first turn on your device, you’re brought to the Home screen. Here, you’ll see an assortment of icons grouped into rows, and several more icons grouped in the silver Dock along the bottom of the screen. The Home screen is where your apps live, and where you can launch them. Because only 16 apps will fit on one Home screen (20 on the iPad), you can have multiple app pages or screens for organizing your apps (up to 11). Above the Dock, you’ll see a series of dots, with one highlighted in white; these dots signify the number of app pages you have. Swipe left or right to go from page to page.
The Dock: The silver translucent bar along the bottom of your Home screen is called the Dock. If you’ve tried swiping between app pages, you’ll notice the icons in the Dock don’t change. That’s because the Dock is for apps you most frequently use; instead of having to swipe from page to page to find an app, you can drop it directly into the Dock for easy access. You can store up to four apps in the Dock.
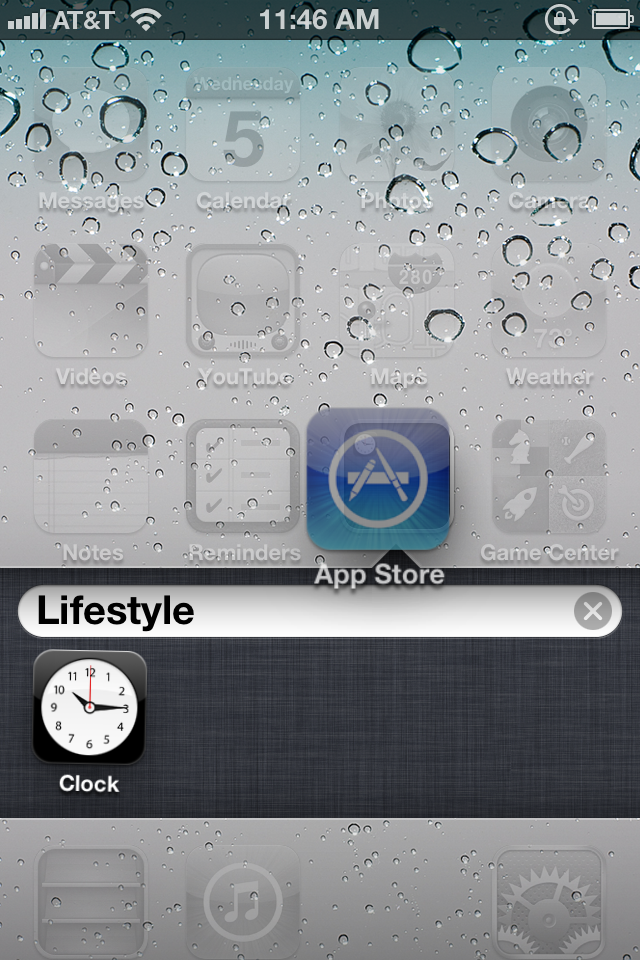
Search in Spotlight: You can search for every email message, webpage, and app on your device, or search through Google or Wikipedia, by swiping right on your Home screen until you reach Spotlight. (If you’re on the first Home screen page, pressing your Home button also summons the Spotlight screen.) To search, just type your query in the text box at the top.
Open and close an app: Want to launch an app? To open it, all you have to do is tap its icon. Once it’s open, you can return to the Home screen at any time by pressing the Home button.
Rearrange and delete apps: To rearrange the order of your icons, tap and hold any icon on the Home screen. After a few seconds, all your app icons, including the one you’re holding, will start to wiggle, and a small black X will pop up in each icon’s top left corner. Once they do this, you can rearrange any apps on the Home screen, or even drag them into or out of the Dock. If you’ve installed a third-party app you don’t want anymore, you can tap the X to delete it (you cannot delete the apps that came preinstalled on your device). When you’re finished, press the Home button, and your icons will stop wiggling and stay in their new location. You can also rearrange your icons and Home screen pages through iTunes when you connect your device to your computer.
Note that you’re not able to delete the built-in apps that come with your iOS device. These include Camera, Photos, YouTube, Clock, Weather, and the all-new Newsstand folder, among others. You’ll be able to tell which apps you can’t delete—they don’t sport the black X. You are able to move around these built-in apps to your liking, however.
Use folders: Having a bunch of apps scattered on your Home screen is OK if you don’t have too many, but when you start amassing a collection, you can use app folders. A folder is a group of apps, represented by a single icon, on your Home screen. Each folder sports miniature icons representing the apps inside, along with an overall name. When you tap a folder, the Dock fades and slides down, making room for a view of the folder’s contents. Within, you’ll find the name and icon for each app. Tap any app to launch it, or tap anywhere outside the folder to return to the Home screen.
To create a folder, start by tapping and holding any app icon to enter edit mode; after the icons begin to wiggle, drag an app on top of another app. When you release the app, you’ll create a folder, which will open and display both apps. By default the folder is named based on the App Store category for one of the first two apps in the folder. If you want to customize this name, just tap inside the field (while still in edit mode) and enter something new. When you’re done, press the Home button to exit edit mode.
To add another app to the folder, reenter edit mode and drag the desired app onto the folder icon. Repeat until you’ve added all the apps you want (up to 12 per folder on the iPhone or iPod touch; 20 on the iPad), and then press the Home button to exit edit mode.
To edit the folder itself, its name, contents, or the layout of the apps inside, you can either enter edit mode and then tap the folder, or, while the folder is open, tap and hold any icon inside. You can then tap the folder’s name to change it, drag apps within the folder to rearrange them, drag an app out of the folder to return it to the Home screen, or tap an app’s Delete button to completely delete it from your device. Unlike apps, folders don’t have a Delete button; to delete a folder, you must remove all the apps from it.
Manage folders from iTunes: iTunes has long allowed users to manage installed apps when syncing, and you can edit your folders too, using your mouse and keyboard. When your device is connected to your computer, the Apps tab in iTunes lets you choose which apps to sync, as well as decide how to organize these apps. Drag an app onto another app and, after a slight delay, a folder is created—just as if you’d performed the same action on your device. You get the same editable folder name, and you can rearrange icons within the folder. Since you’re using a computer, you don’t need to click and hold to enter the jiggling-icon edit mode; you can click and drag anytime. Similarly, to edit an existing folder, just double-click it.
Multitask on your iOS device
Opening and closing an app is easy: Tap the app to open it, and then press the Home button to close it. But when you exit, you’re not actually shutting down the app: You’re freezing it in place, or sending it to run in the background. This means you can have multiple active apps running at any one time, and you can even switch between active apps without returning to the Home screen.
Frozen apps versus background apps: Sometimes you need an app to keep doing something when it’s not in the foreground. For that reason, Apple allows apps to perform tasks in the background using several tools. One of these tools is the push-notification system; another allows music apps to keep playing while the user switches to another app; yet another allows tasks, such as photo uploads, to continue running in the background even if you switch out of the program performing the upload. If your third-party app doesn’t incorporate one of these background features, it will “freeze”, which is to say it will remember whatever you were just doing when you re-open it, but will not process any data in the background.
The multitasking bar: You can quickly switch between apps by bringing up the multitasking bar. To do so, quickly double-press the Home button; a bar below the Dock will rise up from the bottom of the screen, showing off the apps most recently run. To switch to a different app, tap its icon.
Multitasking shortcuts: In addition to holding a list of your most recently used apps, the multitasking bar has a couple of other neat shortcuts for your device.
If you swipe up from the bottom with one finger, you’ll bring up a secondary set of controls. On the iPhone or iPad, you can control the music currently playing on your device, (it defaults to the Music app, but you can also control music from third-party apps).
device’s brightness, slider for controlling volume. Airplane mode, wi-Fi, bluetooth, do not disturb, AirDrop, flashlight, Calculator, camera, lock.
Attractive, very full-featured and completely free with no ads! Contains awesome wake-up alarms, magical sleep timers, an eye-catching clock display and plenty of configurable options. Wake up to a built-in melody (over 70 high quality sounds, from practical to fun to whacky).• Wake up to a custom playlist from your iTunes library.
Full support for fade-out, snooze, vibrate, volume control, backup alarm, and much more. Power Nap mode allows you to instantly set a custom alarm for 5 minutes to 1 hour from the current time.
Sleep Timers
Built-in soundscapes (looping sounds) get you to dreamland in no time flat. Create a custom playlist from your iTunes library. External Audio Mode. Use other apps to play audio (such as internet radio) and Yocto Clock will fade-out and stop the audio when the sleep timer expires. Sleep Timers feature a unique audio book / podcast mode. Listen to audio for a specified time, then gently switch to sleepy-time music.
Other Features
Sophisticated clock display, fully configurable. Weather forecast and current conditions. A fun selection of fonts for the time display. Make the text any color you wish. Choose from built-in wallpaper or select from your own photo library. A full range of gestures to control the app from the clock display. An easy-to-use flashlight mode.
– Screen dimming. Many configurable options.
Plus…
A built-in Mini User’s Guide to help you get the most from Yocto Clock. Full support for devices with Retina displays. Full VoiceOver Accessibility support. A Universal App with full native support for the iPad. Yocto Clock is designed for Apple iPhone, iPod touch and iPad devices. Get your copy today from the iTunes App Store.
This story starts with my dad. He is a retired electrical engineer, a great craftsman and a dedicated family man.
Shortly after he retired, over the course of two weeks, he experienced a 90% loss of vision in his right eye. Two years later, the same thing happened to his left eye. After a battery of tests, doctors insisted that the only explanation was that my dad had suffered a stroke, (he hadn’t) and said there was very little they could do to help him regain his vision.
Just like that, my dad’s life changed drastically. Prior to his vision loss, he could be found in his workshop, tinkering with electronic gadgets or reading the newspaper the way every dad does. Now even simple tasks like making toast take a very long time. Seeing people’s faces has become nearly impossible—he has to resort to identifying people by their silhouette, their voice or their mannerisms. It troubled me to see him so sad after his vision loss, unable to do all the things he was known for. I felt helpless, but as a designer, I started to think of ways to artificially improve his vision.
We went to our local optometrist, who presented a few electronic low vision aids. Trying out the options, we found them to be bulky, difficult to use and completely overpriced, with some options costing as much as €5000. My dad, who always has his trusty iPad with him, leaned over and mumbled “Why can’t it be as easy as my iPad?” That’s when I thought: Could I design and build an iOS vision-aid app? Excited, I enlisted the help of my friend and engineer Sebastian Marr. After hearing about the existing vision-aids, he vowed to help me build a better solution.
The project had begun.
Over the next year, working in our free time, we consulted local low-vision organizations to get more information about the diversity of visual impairments and built our first prototype to test with a number of visually impaired people, including my dad. Now we had proven our theory: that it was possible to provide a highly portable, easy to use and affordable vision aid by building an app native to iOS, one of the best operating systems for the visually impaired.
12 prototypes and 6 months later, we’re proud to present visor — a low-vision aid for iPhone, iPad and iPod touch. Available now in the app store.


 Guided Access is a way to set certain parts of your screen off limits. Are you using a free app with ads and your child keeps clicking the ads? Just draw a square around those ads and suddenly they aren’t clickable anymore! Guided Access has not changed since the iOS8 updates, but is definitely a feature worth mentioning for kids with motor challenges or just learning to use the iPad!
 The Zoom feature underwent a pretty major upgrade in iOS8. Once turned on, you can choose to magnify the entire screen (which is the default setting) or create a Window Zoom. Go to Settings > General > Accessibility > Zoom > Zoom Region and choose Window Zoom. Now, instead of enlarging the entire screen with your three-fingered double tap, you’ll just see a zoom lens (sort of like using a magnifying glass on your iPad) so you can zoom in on specific areas of the screen. If you also turn on the Zoom controller (Settings > General > Accessibility > Zoom > Show Controller), you can control the power of the zoom, resize your lens or even add filters. So now, you could create a lens that zooms and gives you a higher contrast! Wow!