Voiceover for iOS let voiceover be your guide

Accessibility, Apple, Apps, Blind, iOS, ios8, iPad, iPhon, iPhone, iphone1g, ipod, Siri, text, voiceover

  1. Braille Displays


VoiceOver is a gesture-based screen reader that lets you enjoy the fun and simplicity of iOS even if you can’t see the screen. With VoiceOver enabled, just triple-click the Home button to access it wherever you are in iOS. Hear a description of everything happening on your screen, from battery level to who’s calling to which app your finger’s on. You can adjust the speaking rate and pitch to suit you.

With VoiceOver, you’ll use a simple set of gestures to control your iOS device. For example, touch or drag your finger around the screen and VoiceOver tells you what’s there. Tap a button to hear a description; double-tap to activate. Swipe up or down to adjust a slider. Flick left and right to move from one app to the next. When you interact with an element on the screen, a black rectangle appears around it, so sighted users can follow along. When you prefer privacy, you can activate a screen curtain to turn off the display so no one can see it, even as you’re controlling it. And when VoiceOver is talking, the volume of any background audio from music or video automatically lowers, “ducking” under the voice, so you can hear VoiceOver clearly.

Whether you’re composing an email or jotting a note, VoiceOver echoes each character on the keyboard as you touch it, and again when you enter it. Have VoiceOver speak each completed word. A flick up or down moves the cursor so you can edit precisely. To help you type more quickly and accurately, iOS supports multiple character inputmethods — including handwriting — and corrects misspelled words. Enable Speak Auto-text and you hear a sound effect and the suggested word spoken. Keep typing to ignore it, or tap the space bar to have your iOS device type it for you. Pair up an Apple Bluetooth keyboard, and VoiceOver talks you through inputting text in the same way

Apps

Because VoiceOver is integrated in iOS, it works with all the built-in apps, including Safari, Mail, App Store, iTunes, Music, Calendar, Reminders, and Notes. You can also create custom labels for buttons in any app — including third-party apps. So it’s even easier to get to your news, word games, or anything else you love on your iOS device. And Apple is working with the iOS developer community to make even more apps compatible with VoiceOver.

Learn more about how third-party apps can support VoiceOver

VoiceOver includes built-in voices that speak over 30 languages: English (U.S.), English (UK), English (Australia), English (Ireland), English (South Africa), Spanish (Mexico), Spanish (Spain), French (France), French (Canada), German, Italian, Japanese, Korean, Mandarin (Mainland China), Mandarin (Taiwan), Cantonese (Hong Kong), Arabic, Czech, Danish, Dutch, Finnish, Flemish (Belgium), Greek, Hindi, Hungarian, Indonesian, Norwegian, Polish, Portuguese, Portuguese (Brazil), Romanian, Russian, Slovak, Swedish, Thai, and Turkish.

VoiceOver for OS X

Once you learn how to use VoiceOver on your iOS device, you can easily use the same gestures on a Mac. In OS X, VoiceOver allows for gesture-based navigation using the trackpad and supports multiple braille displays. And it features Alex, the voice of Mac, which closely matches how people naturally talk. Learn more about VoiceOver for OS X

Assistive technology is any kind of technology and/or tool that can be used to enhance the functional independence of a person with a disability.

Accessibility, Apple, CarriersUpgrading to the iPhone, Free, FreeApp, iPhone, iphone1g, iPod touch, OS X, people, phone calls, Siri, Sprint, T-Mobile, text, Verizon
Apple just keeps making it better for those who are blind or visually impaired. iOS 8 comes with more features to make it easier for people with low vision or no vision to get the most from their iOS devices. Following you will find misc. information about using the iDevices as assistive technology. I hope you find this guide helpful as you take this journey into the iWorld. Please note: There are new apps coming out every day. This is not a complete guide but more of a jumping off point.
Built-in Accessibility/Functions to explore:
Built-in accessibility features and the development of thousands of specialized apps have made Apple’s iPhone extremely popular among persons with disabilities. Assignable ringtones create an audible caller ID for the blind;  This section explores the IOS accessibility features, including VoiceOver and Zoom, and reviews blind or low vision-specific apps.
There are many built-in features on iDevices that accommodate those with low vision or no vision and help improve productivity. The iPhone and the iPad have some differences here so it is important that you get the tools that best fits your needs. Apple provides a section just on accessibility option worth exploring but also check out the details of many of those built-in accessibility options in the iOS Technology.
Here are the functions we will be covering.
Guided Access,VoiceOver,VoiceOver with Zoom,Zoom,VoiceOver with Maps,Text Completion,Siri,Siri’s ability to launch apps,White-on-Black,Hands Free,Alternate alerts,Custom vibration patterns for alerts
Word highlights in speak selection.
You can find these functions in accessibility. 

VoiceOver,  

VoiceOver, the screen reader for blind and low-vision users, is now integrated with Maps, AssistiveTouch, and Zoom.VoiceOver is a revolutionary screen reader that lets you know what’s happening on your Multi-Touch screen — and helps you navigate it — even if you can’t see it. Touch the screen to hear what’s under your finger, then use gestures to control your device. VoiceOver works with the apps that come with your iPhone, iPad, or iPod touch. 

Siri

Siri, Apple’s intelligent assistant, helps you do the things you do every day.1 All you have to do is ask. Say something like “Tell Jay I’m running late” or “Remind me to make reservations for Saturday.” Siri can send messages, place phone calls, schedule meetings, and even turn on and off VoiceOver, Guided Access and Invert Colors. And because Siri is integrated with VoiceOver, you can ask where the nearest sushi restaurant is and hear the answer read out loud.

Speak Selection

If you have a hard time reading the text on your iOS device, use Speak Selection to read your email, iMessages, web pages, and books to you. Highlight text in any application, tap Speak, and Speak Selection reads the selected text aloud. You can adjust the voice’s dialect and speaking rate, and have words highlighted as they’re being read.

Dictation

Dictation lets you talk where you would type. Tap the microphone button on the keyboard, say what you want to write, and your iOS device converts your words (and numbers and characters) into text. So it’s easy to type an email, note, or URL — without typing at all.

Zoom

Zoom is a built-in magnifier that works wherever you are in iOS, from Mail and Safari to the Home and Lock screens. And it works with all apps from the App Store. A simpledouble-tap with three fingers instantly zooms in 200 percent, and you can adjust the magnification between 100 and 500 percent. While you’re zoomed in, you can still use all of the familiar gestures to navigate your device. And Zoom works with VoiceOver, so you can bettersee — and hear — what’s happening on your screen.

Font Adjustments

When you activate Larger Dynamic Type, the text inside Calendar, Contacts, Mail, Messages, Notes, and even some third party apps, is converted to a larger, easier-to-read size. And you can choose bold text to make the text heavier across a range of built-in applications.

Invert Colors and Grayscale

If a higher contrast helps you better see what’s on your display, iOS lets you invert the colors onscreen. Once you set your colors, the settings apply systemwide, even to video, so you get the same view no matter what you’re seeing.
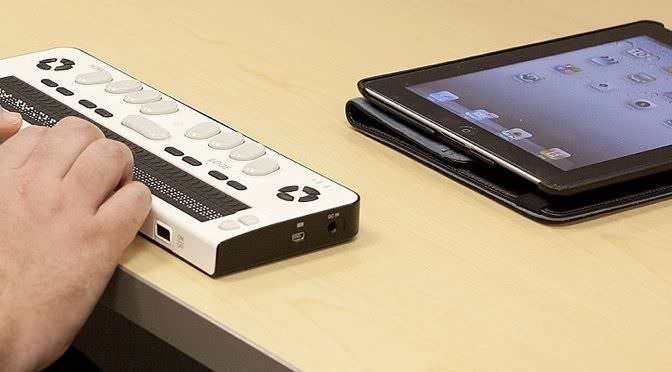
Braille Displays for iOS  It’s easy to use a braille display with your iOS device. More than 40 Bluetooth wireless braille displays work right out of the box with iPhone, iPad, and iPod touch. And iOS includes braille tables for multiple languages. Learn more about iOS braille displays         
Apps for Visually Impaired:
 It is always good to do a little research on an app before purchasing it. Do a search and see if you can find some reviews or talk to others to see if they have tried it. This could save you a lot of money as some apps are just not appropriate or what you might be hoping for. Watching YouTube videos of the app in action i always worth while. 
explored and found, what I feel to be, a couple of great resources for apps for the Visually Impaired:
Apps for the Blind and Visually Impaired –  highlights some of the most innovative apps available.
Gradients of Sight has provided a listing and review of each.
 Magnification and Vision Support listing by Spectronics.com is also a good guide.
spectronics.com has a listing of apps for people who have low vision, and teachers of students who have a vision impairment.
 iPhone iPad apps for the blind and visually impaired blog highlights some of the most innovative and entertaining apps available to the vision impaired.
Not assistive technology but may be worth exploring is: Apps that can aid in Visual Skills
Voice Dream Reader app  provides text-to-speech that lets you listen to any articles, blog posts, reports, papers, and books. It reads the text using the best available text-to-speech technology. You can add it to your Book share account easily. VDR allows for many color options, the Text-To-Speech can be set for wpm, and I think you will like the reading screen feature. 
ViA is a new app from Braille Institute that fills a real need for families with children with visual impairments… it helps you find apps that are accessible and appropriate for blind users! 
Please note that many of the apps in this section would not be considered LV but more instructional.
App Writer US  is an app which is a text editor for the iPad with word prediction, text-to-speech, OCR, and a special font for people who are Dyslexic.
PaperPort allows you to import pictures, documents, items from dropbox, etc. and then either type, write or use speech recognition into text boxes. A digital note taking tool, allowing the user to combine documents, web content, audio, typed text, and handwritten notes into a single document that can be shared.
SoundNote is an iPad alternative to smart pens like LiveScribe, but without the need to purchase a special pen. (It is specific to the iPad and is not available on the iPhone.) It allows you to record audio while you hand write notes with your finger, stylus, or keyboard to take notes during classes, conferences, meetings, etc. When you are finished, simply go to the section of your notes that you want to review and you are immediately taken to that section of the audio as well. 
Voice Dream Reader app  provides text-to-speech that lets you listen to any articles, blog posts, reports, papers, and books. It reads the text using the best available text-to-speech technology. 
Reading Supports to research:
There’s a lot reading supports available from resources such as-
iBooks (come with iDevices)
iBooks for Textbooks (This will be big!)
Learning Ally
Talking Books from the National Library Service
Apps that offer highlighting while speaking the text:  Speak It. A great reading app called Voice Dream Reader can be used with Pocket (or Instapaper). With a webpage, save it to pocket then open Voice Dream Reader which imports all webpages saved in Pocket. Voice Dream Reader ighlights the line which is being read aloud. VVoice Dream Reader uses Acapela voices.
Voice Dream Readerapp  provides text-to-speech that lets you listen to any articles, blog posts, reports, papers, and books. It reads the text using the best available text-to-speech technology. 
Apps for Organization and Productivity:
This is a huge category and there are many, many apps to provide support in these areas. This is one of the main supports I (and many others) use my iPad and iPhone for. I often wonder how I ever stayed organized before my iDevices became part of my life. 
The built in calendar with reminders is probably the most important tool you can use. You can set it to remind you of your appointments in various time increments. It will beep, give you a visual cue…remind you more than once!! It is crucial to use this wonderful tool if you are someone who has any type of life with things you need to remember!
Evernote is perfect for taking quick voice, text, and image notes to use later. The app can also sync with Evernote’s desktop and web versions. Evernote gives whole new meaning to the word “synchronized.” This software uses technology to help organize various types of information from several different sources into one, central, web-based location. The product also allows you to clip web pages and archive them for later reference, store screen shots, photos and text notes, all within a customizable storage system. Evernote will organize things for you by the date a note or other document was created.It is a must have.
Note taking Apps: 
(That sync audio and notes at the individual note level- clicking within text or a drawing, jumps to that place in recording so that the listener does not need to listen to the whole recording playback.) 
Audi olio
AudioNote
Audiotorium Notes
Notability
NoteBook for iPad
PaperDesk
PaperPortNotes
SoundNote
Here is more links.were you can find more apps and videos for the  blind and visually impaired.
My blog iPhone iPad apps for the blind and visually impaired gets updated once or twice a week. If you’d like to get updates please use the follow by e-mail feature. Or use the contact form provided and let me know if you would like to receive updates. http://iphoneandipadappsfortheblind.blogspot.com/search/label/iPad
My Pinterest pin board changes weekly so keep your eye out for more pens.https://www.pinterest.com/chelseaastark/iphone-and-ipad-apps-for-blind-and-visually-impair
Also check out The History of Apple i Phone’s blog.
You can also join the Facebook group titled iPhone iPad Apps for the Blind VisuallyImpaired it is a fun Group to ask questions and learn new things. We are always happy to add new members.

New in iOS 7,8: Ask Siri to Turn on VoiceOver and other Accessibility Settings

Apple, Blind, IOS 8, ios8, iPad, iPhone, Low vision, on off, Siri, video, Visually Impaired, voiceover
iOS 7,8 is Apple’s new operating system for iPhone, iPad, and iPod Touch. iOS 7includes a complete redesigned look and many new features. Siri in iOS 7 has learned some new tricks that can benefit users of VoiceOver and the other built in accessibility features that iOS offers. 
The feature allows you to ask Siri to turn on and off different accessibility settings using your voice. 
For example you can say, “turn on VoiceOver” and Siri will turn on VoiceOver in seconds. 
This feature will make iOS accessibility features easier to find and access. If a VoiceOver user is presented with an iOS device with VoiceOver turned off and triple click home disabled they could use this new feature to ask Siri to turn on VoiceOver. Besides accessibility settings Siri can also change other settings such as brightness, Bluetooth, and Wi-Fi. 

In iOS 8, Medical ID could be a life-saver

Apple, Blind, ID, iPad, iPhone, Medical ID, Siri, Visually Impaired

Apple iOS 8 Health app

Privacy concerns shouldn’t stop you from filling out the info in the Health app

Of all the new features in iOS 8, one hasn’t gotten a lot of attention — and it’s the one feature that all iOS 8 users should at least consider.

I’m talking about the Medical ID record in the new Health app. Even if you aren’t tracking fitness, diet or sleep — and fortunate enough not to be managing or monitoring a chronic condition like diabetes, COPD or heart disease — this is one aspect of the health app worth understanding. Althoughall other HealthKit-related functions are on hold for now, Medical ID is fully baked and ready to use.

The Medical ID pane of the Health app is a pretty generic medical information and history form. It contains much of the data that you’d see requested on a form when you visit a new doctor or an urgent care center — birthdate, existing medical conditions, notes about those conditions or your medical history, allergies (to drugs, foods and environmental factors), medications you’re taking, emergency contact (including relationship to you), blood type, whether you’re an organ donor and your height and weight. The app automatically pulls your name and photo from the iOS Contacts app.

Medical ID info screenYes 
When you first click on the Medical ID icon in the Health app, you’ll see this screen.

To add to or edit that information, launch the Health app, tap on the Medical ID icon (lower right part of the screen), and then click the Edit button at the top. For the most part, all you’ll see are text fields where you can type in the appropriate information. The exceptions are the items at the bottom of the pane for adding one or more emergency contacts, which brings up your contact list and allows you to select from a list of predefined relationships and the fields for blood type, organ donor, weight and height — all of which provide scroll lists of possible entries.
Having that information readily available when you need to provide it during an appointment or treatment is certainly a time-saver, and it ensures that you include everything that’s relevant. That isn’t where the real value of this feature lies, however. The real power and value is the option at the top of the pane labeled Emergency Access, which sports a switch to allow access to the Medical ID panel from the lock screen of your iPhone. This means that in an emergency when you’re unconscious or otherwise unable to speak or unlock your phone, an EMT, some other first responder or an emergency room staff person will be able to access the information. The same is true for friends, family members or co-workers who may come to your assistance. They can do so by using the Swipe To Unlock Gesture and tapping the emergency button instead of entering a passcode. Traditionally, this has only allowed someone to call 911 (or the local emergency services number in another country). If you allow lock screen access to the Medical ID panel, however, there will be a Medical ID button to the lower left of the keypad. Tapping that button calls up a non-editable version of the Medical ID panel. In addition to viewing this information, the emergency provider — or whoever is accessing the information — can also dial your emergency contact(s) simply by tapping on them.This is a great resource for emergency workers and first responders, particularly if you have serious or chronic medical conditions that could cause a collapse (hypoglycemia if you’re diabetic, for example) or that could affect diagnosis and treatment. It’s also a critical source of information on allergies you may have — particularly allergies to medications or any allergy that can be severe or life-threatening — because it increases the chances that your condition will be diagnosed appropriately and that treatment (like a dose of epinephrine for severe anaphylaxis) will be provided quickly.Equally important can be information about medicine you’re taking that may cause side effects or interact adversely with other medications an emergency physician might use to treat you.The medical notes section can be used to keep a record of a range of important details, including recent surgeries or other medical interventions, implanted medical devices and previous hospitalizations. Notes can even be used to indicate the existence of advance directives like a do-not-resuscitate order, a living will or a healthcare proxy. If you observe a particular religion, you could even put in a request for an appropriate member of the clergy to be called if you’re critically ill or injured.You can include your doctor(s) as emergency contacts, something that’s helpful in general, but particularly important if you are seeing a specialist for a serious medical condition such as cancer, because emergency personnel may need additional information from that specialist.
Medical IDApple
A sample Medical ID (filled out) from Apple’s website.
  1. Even if you don’t have any serious medical conditions, using this feature to list your name and your emergency contacts can still be worth the effort. After all, healthy people get into accidents and experience unexpected medical emergencies all the time. This option can also be a useful tool for parents to ensure that they are contacted right away if something happens to one of their children.There is, of course, a caveat: Allowing lock screen access to the Medical ID panel could be a privacy concern. After all, anyone who has access to your iPhone can access this information — even people who aren’t medical professionals, emergency personnel or close friends or relatives. One thing to keep in mind, however, is that someone must have physical access to your phone to look at the information — and if your phone is lost or stolen, the possibility that a stranger may be reading about your medical history isn’t likely to be your biggest concern. Locating the device or wiping it using Find My iPhone would be your top priority.You have serious health issues or allergies, it’s a no-brainer that making this information easily available is worth the minimal privacy risk. If that’s not the case, you can limit the information that you present and disable access from the lock screen. (If privacy is a concern, you should know that Apple separates your Medical ID information from other Health app data and doesn’t allow it to be shared with other apps that access HealthKit.) Or you can decide not to use it at all.The end, it’s your private medical information and you have control of how to use it — or not — on your iPhone.

How to enable and use Hey Siri handsfree mode in iOS 8

Apple, iPhone, ipod, Siri

Apple’s voice-controlled personal assistant Siri becomes even more powerful with iOS 8, including an entirely hands-free mode that allows users to ask questions and accomplish tasks by simply first saying the words “Hey, Siri.”


After installing iOS 8, users can enable Siri’s new handsfree mode by opening their iPhone or iPad’s Settings application, choosing General, and then Siri. From there, simply ensure that the switch for “Allow ‘Hey Siri'” is turned on.

“You can speak to Siri without pressing the home button by saying ‘Hey Siri’ when connected to power,” iOS 8 notifies users.


“Hey, Siri” works in any situation as long as the iPhone or iPad is plugged in, even if the screen is locked or if an application is open and running. Users can simply speak naturally, and do not need to pause after saying “Hey, Siri.”

In addition to the new handsfree mode, will Siri also tap into the HomeKit features Apple has baked into iOS 8. As new applications and third-party accessories hit the market, users will be able to use Siri to accomplish tasks like adjusting the temperature in their home, closing the garage door, or even locking the front door.

The Coolest 21 Features IOS8 You Didn’t Know About

Apple, Apps, Blind, iOS, ios8, iPod touch, Siri, video, Visually Impaired

Tomorrow September 17 iOS 8 is available for us all to download.

The Coolest 21 Features in iOS 8 You Didn’t Know About or remember.
Some of these features may or may not be useful for those who are blind or visually impaired but we will add them all anyway just so you can learn more. This will be a brief overview. We will be covering each one of these features in the future one at a time.
Apple’s newest mobile operating system, iOS 8, is almost out for the general public, and we’ve got a rundown on the best new features you can expect on your iPad, iPhone, and iPod touch. While there’s not a huge visual change as there was from iOS 6 to iOS 7, there’s still plenty of cool new features in iOS 8 to be excited about.


1. Find Out What Apps Are Killing Your Battery

Don’t you just hate it when you get the dreaded low battery screen on your eye device. Now monitoring battery usage has never been easier on iOS. Now you can easily view battery usage on a per-app basis to aid in tracking down battery-hogging apps.


2. Reply to Texts Faster with Interactive Notifications


Notification banners and alerts are interactive! From anywhere on your device, even your lock screen, pull down on the notification to quickly respond to text messages, trash emails (or mark them as read), snooze a reminder (or mark it as complete), and accept/decline calendar invites. Through Facebook and other third-party apps, you’ll be able to perform similar functions from the banners, like commenting on or liking a post.
If you’re afraid of your privacy being invaded—since friends and family could potentially do something destructive through these notifications on your lock screen—you can disable notifications for each app through the “Notifications” settings. Additionally, developers will require passcodes for certain lock screen notifications.


3. Use Siri with No Hands

With the addition of a voice-activation feature, you can now activate Siri by saying “Hey, Siri” out loud whenever the device is connected to a power source, although the iPhone will be able to utilize this feature without a power connection.Siri will then listen for your commands, which is especially useful when your hands are busy while you’re driving, which makes calling someone or finding directions a completely hands-free experience.

4. Siri Makes Shazam Super Easy

Another new feature with Siri is the built-in Shazam integration. Just activate Siri and ask “What song is playing?” or “What song is this?” Siri will then listen and pull up a listing of the song and artist, with a link to purchase it directly from iTunes. 

5. There’s Predictive Text in the Keyboard

With predictive text, called QuickType, you can type in a few letters and your keyboard will provide options for it thinks you might type next. Once you type a complete word, you’ll see suggestions for common quotes or phrases, celebrities and musicians, movies and television shows, and more.
QuickType also intelligently analyzes the last text sent to you. When asked questions through text messaging, QuickType will usually offer options likeyesnosure thing, or I’ll get back to you.
If you receive a message with two options and an “or” in-between them, QuickType intelligently pulls the two options from the message sent to you, as suggestions.

6. You Can Now Use Third-Party Keyboards

Another huge addition to the iOS keyboard is third-party keyboard integration, bringing the likes of Fleksy, SwiftKey, TouchPal, and more.
With a keyboard such as TouchPal, you can use swipe gestures to spell out words and phrases without lifting a finger, as well as the ability to enter numbers and punctuation without changing keyboards.

Image via wonderhowto.com

Other keyboards like TextExpander provide useful tools such as easy-to-use keyboard shortcuts, while QuickBoard for iOS 8 integrates copy and paste boards directly on the keyboard; all of which will make typing on iOS 8 something spectacular.

7. There’s Snapchat-Like Self-Destructing Media

Inspired by Snapchat’s ephemeral nature, iOS 8 now brings self-destructing audio, imagess, and videos to the stock Messages app. Hold down on the microphone or camera icon and quickly take a photo, record a video, or lay down some audio. When you release the icon, the files will send, but will then self-destruct after a set period of time.
Vice president of iOS product marketing Greg Joswiak says about this feature, “You don’t want to have to clean these up. Audio and video messages can take up space, so they’re set to self-destruct unless you choose to keep them.”
However, you can save these files if you want by adjusting your settings.

8. Scan Payment Cards to Auto-Fill Data

When making online purchases through Safari, you can now save yourself the hassle of manually inputting card information. Instead, just snap a picture of it and watch your relevant information automatically fill in the form. This worked extremely well on Amazon, but failed when using Midtowncomics, so while it’s not universal, it should work with most major online retailers.

9. Battery-Saving Grayscale Mode

With the iPhone 6 stocked with a crisp, Sapphire AMOLED display, placing the device in grayscale mode will help extend battery life. By rendering pixels black and inactive, therefore not utilizing the backlight, grayscale reduces battery drain. 

Battery-Saving Grayscale Mode Will be useful for those who are completely blind. Turning on grayscale mode Will help you save some battery.

10. FaceTime Gets “Call Waiting”

By popular demand, FaceTime now has a “call waiting” function displayed when receiving a request during a current FaceTime session. Now it’s easy to decline the incoming call, or end your current one while accepting the new one. Of course, accepting the new call ends the old one, so it’s not exactly like the call waiting we all know and love.
[1] Oh cool. [2] You can FaceTime with yourself!

11. There’s Wi-Fi Calling Now

Wi-Fi calling won’t just help save your data, but according to those who have used it, the calls sound clearer. As of now, this feature is only present on the T-Mobile variant. Expect this function to roll out to all carriers in the very near future.
To enable it, head into Settings -> Phone -> Wi-Fi Calling, then simply toggle it on. When enabling Wi-Fi calling, you must enter a physical address, presumably on the off-chance that you’ll need to make an emergency call.

12. You Can Now Leave Annoying Group Chats

Leaving group chats is one feature that many have long asked for (including myself), simply because group messages can become an annoyance after a while, accumulating hundreds of texts and, subsequently, notifications.

13. Access All Attachments in a Message Thread

Accessing all attachments in Messages is a very useful feature, allowing you to easily find and save all of the pictures, videos, and audio files shared between you and another person, without having to scroll through the entire conversation.

14. Send Multiple (Recent) Pictures at Once

Sharing pictures is also now easier do, with a preview of recent photos showing up when you tap on the keyboard’s camera icon.

Image via wonderhowto.com

15. There’s Widgets in the Notification Center

While not as good as they could be, widgets are finally available in iOS 8, accessible only through the Notification Center. Just scroll down from the top of the screen and you’ll be able to access important information from your favorite apps, as well as perform truncated functions.

Image via BGR


16. Get Faster Access to Recent Contacts


By double-pressing the Home button in iOS 8, you not only get access to the app switcher, but you can now see “Phone Favorites” and “Recents” in theretoo. Just tap on a contact bubble to get options for phone calls, text messages, and FaceTime (or FaceTime audio) to keep in touch quicker with the people you contact the most.

17. Time-Lapse Videos!
Apple has now added a native time-lapse feature to their stock camera in iOS 8, shooting photos in dynamically selected intervals.  If you don’t want this feature enabled, maybe to prevent others from knowing who you’ve recently contacted, you can disable it. Actually, you can disable “Phone Favorites” or just “Recents”—even both if you want. See how here.

18. New Photo-Editing Tools

In the stock photo-editing tools, you can now fine-tune every aspect of a photo, such as automatically straighten horizons, modify light and adjust exposure, brightness, contrast and more.

19. Set Timers & Control Exposure in the Camera

Set a three or ten second timer directly from the camera viewfinder, as well as manually change the exposure by swiping up and down on the screen.

20. Do More in Notes

In the new version of Notes for iOS 8, you’ll be able to jot down your notes in rich text (bold, italics, and underline), as well as be able to include photos.

21. Recover Deleted iPhone Photos

In iOS 8, you’ll no longer have to worry about recovery tools or performing backups to get back your deleted photos. Apple is taking a preemptive approach to accidental deletions by allowing you to easily recover pictures or videos directly from your iPad or iPhone. 
What do you think of the new iOS 8 for iPad, iPhone, and iPod touch. Share your thoughts below, or chat with us on Facebook.

iWatch Rumor Roundup: Everything We Think We Know

Apple, Blind, Color ID, FreeApp, I watch, iCloud, iPad, iPhone, iphone1g, iPod touch, PC, Siri, Visually Impaired

The History of Apple iPhones: iWatch Rumor Roundup: Everything We Think We Know: iWatch Rumor Roundup: Everything We Think We Know This information was provided by  GIZMODO and  Brian Barrett Profile Brian Barrett Filed t…

iWatch Rumor Roundup: Everything We Think We Know

This information was provided by  GIZMODO 

iPhone 6 and iWatch. Perfect companions. iPhoto: Martin Hajek

iPhone 6 and iWatch. Perfect companions. iPhoto: Martin Hajek
Apple will unveil its first foray into wearables at a special event in September, reports Recode’s John Paczkowski who previously reported that Apple had an October event scheduled for the iWatch, but the plans have changed.
Rumors of production delays have hounded the iWatch over the last few months, suggesting Apple might not even reveal the device until early 2015, but according to Recode’s report, the iWatch will actually debut alongside the two new iPhone 6 models during an event on September 9th.

Read more at http://www.cultofmac.com/292911/apple-reveal-iwatch-alongside-iphone-6-september-event/#umRKjPSjs3kHkMeK.99iWatch Rumor Roundup: Everything We Think We Know

If it feels like the promise of an Apple smartwatch has been looming forever, that’s because it has. And its shadow helped birth the army of other smartwatches that we have today. But now, finally, the near mythical iWatch is rumored to arrive very soon. Here’s what we think we know.

What’s it called?

Colloquially, Apple’s upcoming watch has been referred to as an iWatch, though there’s not evidence that this might be its name outside of it following Apple naming conventions. Information about the size of its screen and the bevy of health features it will include suggest it might be actually be more of a “health bangle” anyway. Apple has acquired the trademark to “iWatch” in a number of countries, though that’s pretty soft evidence.
Apple has filed patents for a wearable device with swappable screen modules that makes a reference to something called iTime, so that’s a possibility as well, though Apple would probably be wiser than to blow the real name in a patent.

iTime: Smartwatch Patent Shows Apple’s Broad Ambitions
For our purposes, we’re going to keep calling it the iWatch and hope that Apple has something more clever up its, er, sleeve.

Design

One of the big (rumored) differentiators for the iWatch is design. That is to say, the iWatch is supposed to look good, unlike most of the other, grosser-looking options that are available right now. (Excluding the Pebble Steel and the Moto 360, of course.)
Evidence of this is backed up by a number of hires that Apple has made in the past few years. Hires like former CEO of Yves Saint Laurent Paul Deneve and Senior VP of Retail Angela Ahrendts, who helped revitalize Burberry as CEO without abandoning its heritage. We’re talking legit fashion people, as opposed to tech people with an eye for pretty things.
What will all those expensive salaries come up with though? That’s a much bigger question. We’ve seen concepts left and right, and although some of them look nice, none of them quite has that Apple flair. Unfortunately, there hasn’t been a lot of information on what the iWatch will look like. No physical leaks of any sort. In a broader sense that iTime might offer some clues, as it shows a watch-type band with modules that can snap in and out. It’s similar to the WIMM One from WIMM Labs, a recent Google acquisition.
iWatch Rumor Roundup: Everything We Think We Know
These sketches are broad, though, as patent sketches are, and it’s meant to cover functionality not design, so it’s of little help. Not to mention that patents aren’t necessarily indicative of actual products; companies patent things all the time with no intention of ever actually making them. A slightly more substantial and interesting pair of reports came from Reuters and the Wall Street Journal, suggesting respectively that the iWatch could have a 2.5-inch screen, and that it might come in different sizes.
A 2.5-inch screen for a traditionally-shaped watch is nuts. The clunky Galaxy Gear clocked in at a mere 1.63-inches. So if the 2.5 inch screen rumor is true, it suggests something either more like a curved bracelet, or a giant hunk of Apple on your wrist. What does seem like a sure thing is that the iWatch will have an unscratchable sapphire glass watchface, due to recent evidence that Apple is producing “jewelry-grade” slices of the stuff. But other than that, the options are still pretty excitingly open.

iWatch Rumor Roundup: Everything We Think We Know

Guide to iOS 7 Accessibility Enhancements

Apple, bigclock, Blind, Color ID, Free, FreeApp, iCloud, iPad, iPhone, iphone1g, iPod touch, PC, Siri, video, Visually Impaired

With the release of iOS 7, Apple has added many new accessibility features that make an iPhone and iPad easier to use for people with disabilities. 
 NEW IOS 7 ACCESSIBILITY FEATURES 

The accessibility settings are still located under the general menu but the Accessibility option menu item is located closer to the top of the list.  In previous versions, this menu option was near the bottom of the list.

The shortcut to quickly turn on and off accessibility features has been renamed from Triple Click Home to Accessibility Shortcut.  It still works the same way – you triple click the home button to show the menu options.  In iOS 7 there is a new accessibility shortcut menu item to turn on switch controls.

Siri

  • New Siri commands allow users to enable some accessibility options, such as “turn on VoiceOver” and “Open accessibility settings” (iOS 7 SIri Command List)
  • Expressive voices – Siri’s voice output is now independent of VoiceOver

Visual Accessibility Features

  • VoiceOver
    • New gestures
      • Four finger double tap – starts or stops VoiceOver help
      • Quadruple three finger tap – copy the last spoken text to the clipboard
      • Tap the status bar and swipe up with three fingers – start the control center (to exit do a two finger scrub on the home screen)
      • Press the home button and tap on the screen – unlock the screen
      • Double tap with two fingers  (when in  a form field) – allow the user to dictate in the edit field; performing the gesture again will finish the speaking
    • New rotor settings
      • Handwriting – option for both writing and navigation.
        • Writing – a three finger swipe up and down will change the case of the letter, a two finger swipe right will input a space, and a two finger swipe left will backspace
        • Navigation – drawing a letter on the screen will find matching apps that start with that letter.  When in Safari, writing a letter will start that rotor option.
      • Sound effects – turn on and off VoiceOver specific sound effects
    • New phonetics options – off, character and phonetics, and phonetics only
    • Enhanced voice and language support – in the settings a user can install more than one speech synthesizer and select the dialect (e.g. U.S. English, Australian English)
    • Large cursor option – displays a larger and thicker cursor for VoiceOver
    • Math input support using Nemeth Braille in VoiceOver
    • Web content on Safari
  • Visual appearance
    • Type adjustments – users can now adjust the boldness and type size
    • Increase contrast toggle
    • On/Off labels – add a small 0 or 1 to indicate when the control is in the on or off position
    • Reduce motion – adjusts the colors to improve certain color combinations where the text appears to move

Hearing Accessibility Features

  • Subtitles and captions option – now relocated to the Accessibility settings; this is a global setting that will apply to all videos
  • Style for captions – there are several styles to choose from or you can create a new style

Learning Accessibility Features

  • Guided Access
    • Allows the disabling of the Sleep/Wake and Volume buttons
    • Developers can now hide parts of the screen when this feature is turned on to reduce distractions for users
  • Speak Selection
    • Now has enhanced language support including different speaking rates for supported languages
    • Additional voices can also be downloaded that are more natural sounding and are easier to understand
  • Built-in Dictionary
    • Additional languages can be downloaded
    • Support for foreign languages

Motor Accessibility Features

My favorite new enhancement in iOS 7 is the new switch support which will allow users with mobility impairments to interact with the device using external switches, screen taps or through head motions.
  • Switch Support
    • Users can connect one or more switch devices and set the desired action for the switch
      • Three different types of switches:  external switches, screen and camera for head motion
      • Desired scanner or system action for the switch can be set by the user
        • Scanner options:  select item, scanner menu, resume auto scanning, move to next item, move to previous item, and stop scanning
        • System options: tap, app switcher, home button, notification center, Siri, decrease volume and increase volume
    • Many options available to customize the experience when using switches
    • Switch support is now included on the accessibility shortcut menu
  • New external switch devices (not included with iOS 7, these are external devices that can be purchased)
Apple has done a great job with the accessibility features in iOS 7.  If you have not downloaded the new version, we highly recommend it.  As we learn about new features, we will update this blog post.

IOS 7 ACCESSIBILITY ARTICLES AND VIDEOS

Restore your existing iOS device from a iCloud back up

Apple, bigclock, Blind, Color ID, Free, FreeApp, iCloud, iPad, iPhone, iphone1g, ipod, iPod touch, Siri, video, Visually Impaired

When you set up a new iOS device or need to restore information on one you already have, your iCloud backup makes it easy.

Restore from an iCloud backup

  1. On your iOS device, go to Settings > General > Software Update. If a newer version of iOS is available, follow the onscreen instructions to download and install it. You must update your device to the latest version of iOS to make sure you can restore from a recent backup of another device, such as a lost or broken device. Please note step one may or may not apply to what you’re doing. Personally I would decide if I want to update or not. You may or may not be forced to do that.
  2. Make sure you have a recent backup to restore from.        
    Go to Settings > iCloud > Storage & Backup, then look at the bottom of the screen for the message Last Backup, followed by the date of the latest backup.
    For information about backing up manually now, see Back up your iOS device to iCloud. If you don’t see a backup you expected to be there, see the Apple Support article iCloud: Troubleshooting restoring an iCloud backup.
  3. Go to Settings > General > Reset, then tap “Erase all content and settings.” 
  4. In the Setup Assistant, proceed to “Set up your device,” tap Restore from a Backup, then sign in to iCloud.
  5. Proceed to “Choose backup,” then choose from a list of available backups in iCloud.
  1. After using an iCloud backup to restore a device:
  • Your settings and accounts are restored from the iCloud backup you chose. Your device restarts and begins downloading your purchased music, movies, TV shows, apps, books, Camera Roll, and other content. If your device can’t download the version of an app that was backed up, it downloads the latest version.
    Your purchased content is automatically downloaded from the iTunes Store, App Store, or iBooks Store based on iTunes in the Cloud availability by country. Previous purchases may be unavailable if they have been refunded or are no longer available in the store.
  • You may be asked to enter passwords for iTunes, App Store, and iBooks Store accounts to restore purchased items.
  • Progress bars appear below Home screen icons for apps being downloaded.
    To make an app a priority for downloading, tap its icon.
To check if the information on your device is fully restored, go to Settings > iCloud > Storage & Backup.
If you subscribe to iTunes Match, you can download your songs, albums, and playlists from iCloud after other information on your device is fully restored.
For information about messages that may appear while restoring information from an iCloud backup, see the Apple Support article iCloud: Troubleshooting restoring an iCloud backup.
Note:   You can restore information on your iOS device from an iTunes backup instead of an iCloud backup. For information, see the iTunes Help topic Back up your iPod touch, iPhone, or iPad.

Creating a iCloud Account. And Getting started.

Apple, bigclock, Blind, Color ID, Free, FreeApp, iCloud, iPhone, iphone1g, ipod, iPod touch, PC, Siri, video, Visually Impaired

Set up iCloud on all your Devices. 

The rest is automatic.

Get iCloud up and running on your Mac in a few easy steps. Then set up iCloud for your iPhone, iPad, iPod touch, or PC.

iCloud storage and backup overview
When you sign up for iCloud, you automatically get 5 GB of free storage. Your iCloud storage is used for iCloud Backup, app data and documents stored in iCloud, and iCloud Mail (your @icloud.com email account).
If you run out of space, there are several ways you can increase your available iCloud storage. For example, you can decrease the size of your Camera Roll backup, change which apps you back up, or delete documents and old email messages you no longer need. You can also increase your storage by upgrading your storage plan. For more information, see iCloud storage management overview and Upgrade your iCloud storage.

What iCloud backs up

You have important information on your iPhone, iPad, and iPod touch. iCloud automatically backs up your device over Wi-Fi every day while it’s turned on, locked, and connected to a power source. With your device information backed up in iCloud, you can easily set up a new device or restore information on one you already have.
Here’s what iCloud backs up:
  • Purchase history for music, movies, TV shows, apps, and books
    Your iCloud backup includes information about the content you have purchased, but not the purchased content itself. When you restore from an iCloud backup, your purchased content is automatically downloaded from the iTunes Store, App Store, or iBooks Store. Some types of content aren’t downloaded automatically in all countries, and previous purchases may be unavailable if they have been refunded or are no longer available in the store. For more information, see the Apple Support article iTunes in the Cloud availability by country. Some types of content aren’t available in all countries. For more information, see the Apple Support article Which types of items can I buy in my country?.
Your iOS device backup only includes data and settings stored on your device. It doesn’t include data already stored in iCloud, for example contacts, calendars, bookmarks, mail messages, notes, shared photo streams, My Photo Stream, and documents you save in iCloud using iOS apps and Mac apps.
It’s important to back up your iOS device, just as you should your Mac. You can back your iPad or iPhone up to your computer using iTunes, or you can back it up to Apple’s iCloud. If you do the latter, the device backs up whenever you’re connected to a Wi-Fi network, keeping your data well protected.
But iCould has its limits, namely the measly 5GB of free storage you get to cover all devices associated with your Apple ID. You might find yourself running out of space, especially if you have more than one iOS device and use iCloud for email and document storage. Here are some tips for optimizing your iPhone and iPad backups.
If you recently picked up a new Mac, iPhone, iPod, or iPad, you may have seen mention of something called iCloud when setting up your device. If you don’t already know, iCloud is a free syncing and backup service from Apple that aims to keep all of your devices—mobile devices running iOS 5 or later and desktop computers running OS X Lion or later, or Windows Vista or later—on the same page, with the same data, no matter which one you’re using at any given moment.
We’ve written before about what you get with your iCloud account. But what if you’re unsure about how to set up iCloud in the first place and how to get it to work on your Mac, PC, iOS device, and Apple TV? We’ll show you.

Sign up for an iCloud account

A few notes before we begin: Although signing up for iCloud is free, you can’t do so just anywhere. You must create an account on either a mobile device running iOS 5 or later or a Mac running OS X 10.7.5 or later. Unfortunately, Windows users have to create an account on one of these platforms before they can log in from a PC.
Apple also limits you to creating ten iCloud accounts per device. You should ever need only one or two, so you’ll probably never run up against the limit; because the limit persists after full device wipes, however, you may see a warning about it if you’ve received an older iOS device or Mac. If you do get an alert preventing you from making a new iCloud account, I suggest going to your nearest Apple Store, where they should be able to help you sort it out.

Do you have an Apple ID?

If you’ve ever purchased anything from the iTunes Store, App Store, or iBookstore, you have an Apple ID. (It’s probably the email address you used to sign up for iTunes.) If you’ve logged in to the iTunes or App Store apps with this Apple ID, you should see the email address already filled out in the Apple ID section of the iCloud screen.
All iCloud accounts stem from Apple IDs, so it’s easy to convert your current Apple ID into an iCloud account. You’ll still be able to use your Apple ID for everything you currently use it for, but you’ll also get all of iCloud’s features. And if you have family members who use this Apple ID, they’ll still be able to use it for purchases without getting all of your iCloud information. (For more on managing multiple Apple IDs and iCloud, see our explanation about common signup scenarios.)
NEW MAIL If you want to add an iCloud email address to your old Apple ID, just turn on the Mail switch (or check the checkbox on your Mac) in your iCloud preference pane.
To convert your Apple ID into an iCloud account, open the iCloud preference screen on your iOS device or Mac, and then sign in to iCloud with your current Apple ID and password. The screen will prompt you to agree to the iCloud terms and conditions; once you do, you’re ready to begin using the service.
Note: If you do convert an Apple ID into an iCloud account, you won’t get an iCloud email address (@icloud.com) by default. If you want one, simply go to Settings > iCloud on an iOS device and toggle the Mail switch on (or, on a Mac, click the checkbox). You’ll then see a prompt to create an iCloud email address to go along with your account.

Starting from scratch

Never used iTunes before? On an iOS device, go ahead and tap the Get a Free Apple ID button at the bottom of the iCloud settings screen. (On a Mac, clickCreate an Apple ID.) The screens will request your birthdate and name, and ask whether you’d like to use a current email address or create an iCloud.com email address for your Apple ID. Even if you elect to use your old email address, you can create a new iCloud.com address after making your account by going toSettings > iCloud and turning on the Mail switch.
STARTER KIT You can use a current email address or create a new one for your Apple ID.
From there, you’ll either have to enter your current email address or type what you want your new iCloud email address to be. The service also prompts you for a password for your account and a security question.
After that, to finish up, simply indicate whether you want to get email updates from Apple, and then agree to the terms and conditions. You’re ready to start using iCloud.

Set up an iOS device

Originally iCloud was introduced as a sync mechanism for iOS devices, and consequently the iCloud signup process is most straightforward on your iPhone, iPad, or iPod. You need a device running iOS 5 or later; if your iPhone or iPod is still running iOS 4, you can’t get in on the iCloud action until you upgrade.
When you first set up your device, you should have seen a screen asking you to sign in or sign up for an Apple ID and iCloud; even if you chose not to set that up when you first unboxed the gadget, getting an account is simple.
On your device, open the Settings app and tap the iCloud entry. You’ll see a space for logging in with an Apple ID and password, and a Get a Free Apple IDbutton at the bottom.
Once you’ve set up iCloud on your iOS device, most of it starts working automatically: It syncs your email (if you’ve set that up), along with any previously created contacts, calendars, reminders, notes, Passbook passes (iPhone-only), and Safari bookmarks, to its central online server. Photo Stream, too, starts automatically uploading the last 1000 photos you’ve taken. All iCloud options are on by default; if you want iCloud not to sync a specific item type, just tap the appropriate toggle to turn it off.
FULL BOAT On iOS, you have access to almost all iCloud features.
You can also start creating backups of your iOS devices by going to Settings > iCloud > Storage and Backup > Back Up Now.

Set up a Mac

The Mac setup process is very similar to that of an iPad, iPhone, or iPod: You use the iCloud settings pane in System Preferences. To add or create an iCloud account, your computer needs to be running OS X 10.7.5; any earlier, and you won’t have that pane. (Thomas Brand’s Egg Freckles blog has a few suggestionsfor using parts of iCloud on older systems.)
iCLOUDY GATES The iCloud preference pane on a Mac lets you sign in with your Apple ID or create one on the spot.
As on an iOS device, once you’ve set up iCloud on your Mac, it syncs your email (if you have set that up), contacts, calendars, and so on. All options are on by default except for ‘Back to My Mac’, which you must turn on manually; again, if you want iCloud not to sync specific data, just click the respective toggle to turn it off.
CHECKBOXES, CHECKBOXES Don’t want to enable certain iCloud features? Just uncheck those checkboxes.
Unlike with iOS devices, you can’t create iCloud backups of your Mac—in part because said backups would likely eat up all your iCloud storage space, given the size of most Mac hard drives. But your Mac does offer support for iCloud’s data sync, allowing iCloud-compatible programs to store their documents and data there.

Set up a PC

In contrast to iOS devices and Macs, a Windows PC doesn’t come with any kind of iCloud control panel preinstalled; you first have to download it from Apple’s website. And, as noted above, your PC is also the only device you can’t use to create an iCloud account, so you’ll need to have first made one on your Mac or iOS device.
When you sign in to the control panel for the first time, it asks whether you want to send diagnostic and usage information to Apple; accepting this arrangement allows the company to automatically (and anonymously) collect data on any crashes you might have related to iCloud, and to send that data back to its central servers to prevent similar crashes from happening in the future.
SIMPLE SYNC You don’t get as many options for syncing iCloud information on Windows as you do on the Mac or on iOS.
Your sync options for iCloud on the PC are limited in comparison to those on iOS devices and the Mac: You can sync email (if you’ve created an iCloud.com account); contacts, calendars, and tasks in Outlook; Web browser bookmarks; and your Photo Stream. Unfortunately, the Windows operating system doesn’t support syncing reminders, notes, iCloud data, or PC versions of Back to My Mac or Find My Mac.
If you need to make a change to your reminders and notes (or if you just want to see them), you can still access them online via iCloud.com.

Set up an Apple TV

Although your Apple TV doesn’t have access to iCloud’s calendars, reminders, notes, or mail, you can still access iCloud features such as Photo Stream and iTunes Match when you log in with the Apple ID tied to your iCloud account. To do so, go to the Settings screen of your Apple TV, click iTunes Store, and enter your account information.